
Did you all enjoy spring break? We traveled to Colorado to visit my family. I love watching my kids enjoy the beautiful mountains and all Colorado has to offer! My childhood was spent mostly outside, in the mountains of Colorado – I was blessed!! It is beyond wonderful for me when I get to share my favorite childhood activities with my kids. This break we took the kids for their first ever snow tubing experience in the Colorado mountains. I forgot what 9,000+ feet does to your lungs! We also got to enjoy a couple of the amazing parks in Fort Collins, climb rocks, fly kites, catch up with friends, and visit my grandparents. The drive was long, but well worth it!
Tubing….

Flying kites, and climbing rocks!!!

I posted to Facebook that I felt guilty encouraging anyone to work over spring break, especially since I was laying in the grass feeling the warmth of the Colorado sun as I created my post! (the sun is really SO much warmer with the higher elevation) If you can’t tell, I LOVE Colorado!!! But now I’m back to reality… Yesterday consisted of unpacking, cleaning, and doing 5 loads of laundry. That is always the bad part of vacation, but we have done a lot of road trips since Carter was born 9 years ago and I feel like I finally have a manageable routine down! And yes, I have made a note to blog about my process one day soon!
But now that we have had our fun, and gotten the house back in order I’m itching to get back to projects (for me and others), and get working again. Are you ready to finish up your master closet? or at least find out what else I’ve done in mine!?!
In my last post I shared my new purchase, an Elfa drawer set from The Container Store. My heart jumps each time I use it – even though I’m just getting underwear or p.j.’s! Yes, I’m serious – I get all giddy excited every time I use it. I know that makes me a little odd, and a lot different than the average person – but I’m good with that! I love how the drawers glide out nice and smoothly to reveal an orderly and easy to view display of my clothes. I no longer dig through small bins to find what I’m looking for… or dump the contents on the floor to get to the bottom! The added storage has also allowed me to spread my clothes out and store things more efficiently.
Here is the visual difference of having my new drawers… Much better, not even accounting for function!
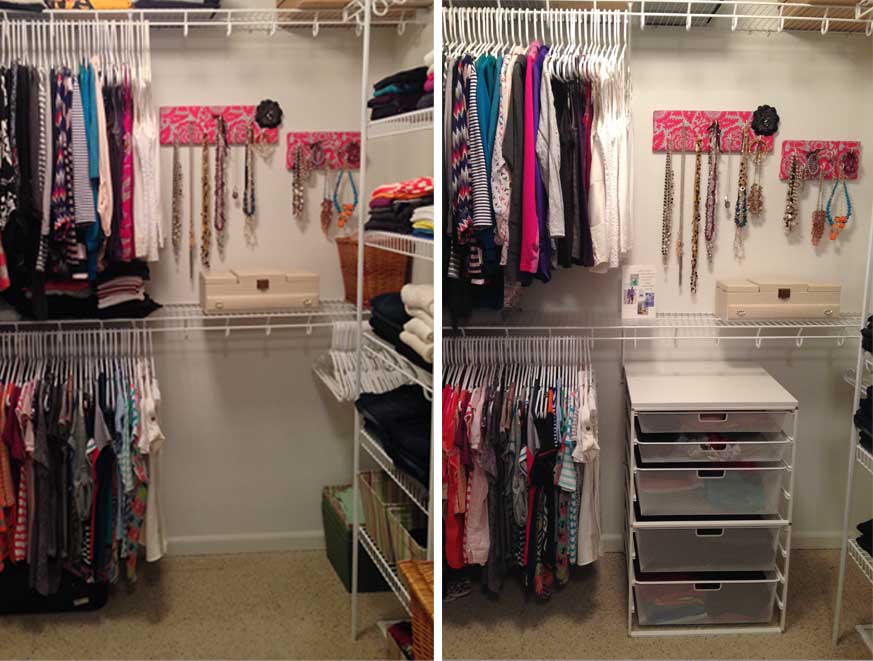
You can see the clutter that was removed by adding these drawers…
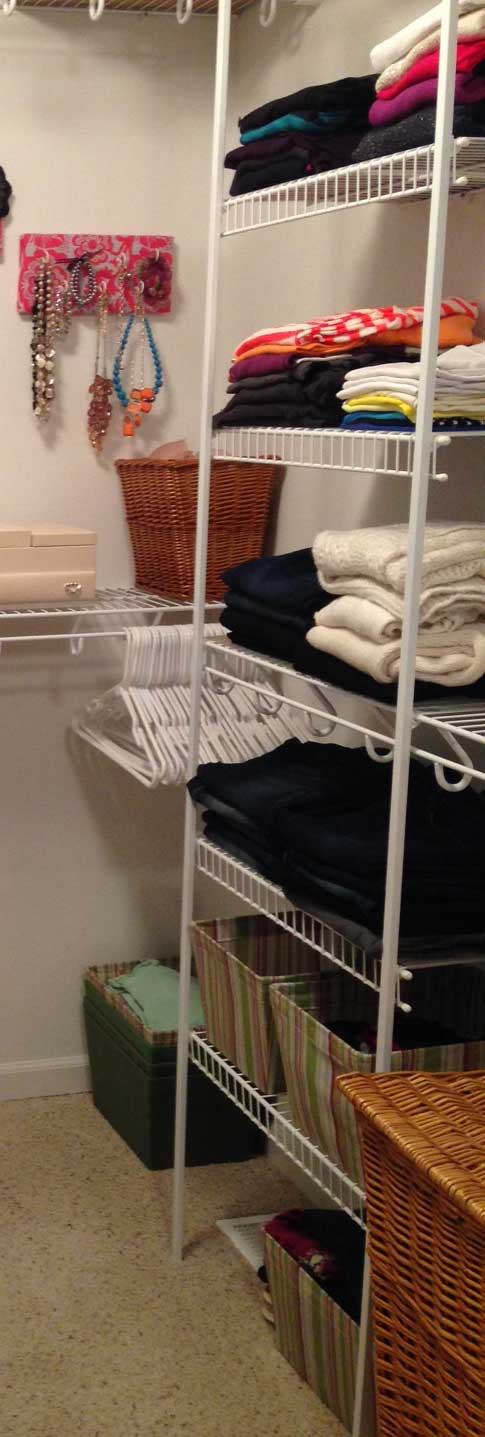
I no longer need the moss green storage bins on the floor, or on my shelves.
I was able to relocate the stacks of shirts on the shelf below my hanging clothes –
which was NOT a good location for them!
The basket to the right of my jewelry could be removed – it had my bras in it – obviously NOT practical!
And although the drawers take up some visual space, since they are white they don’t feel like clutter.
Here is the stack of drawers, with all of my belongings in it…

Drawer #1: Underwear, and Bras (you don’t really need to see those) : )
Drawer #2: Socks and Tights
Drawer #3: Workout T-Shirts, Tanks & Sportsbras
Drawer#4: Workout Pants (yes, my wardrobe is basically just black yoga pants!)
Drawer #5: Pajamas (the basics… you don’t need to see the other ones either!)
Getting all of those items off the shelves – along with the old bins I had them stored in – created so much more space for my clothes.

Do you remember what that corner looked like before?
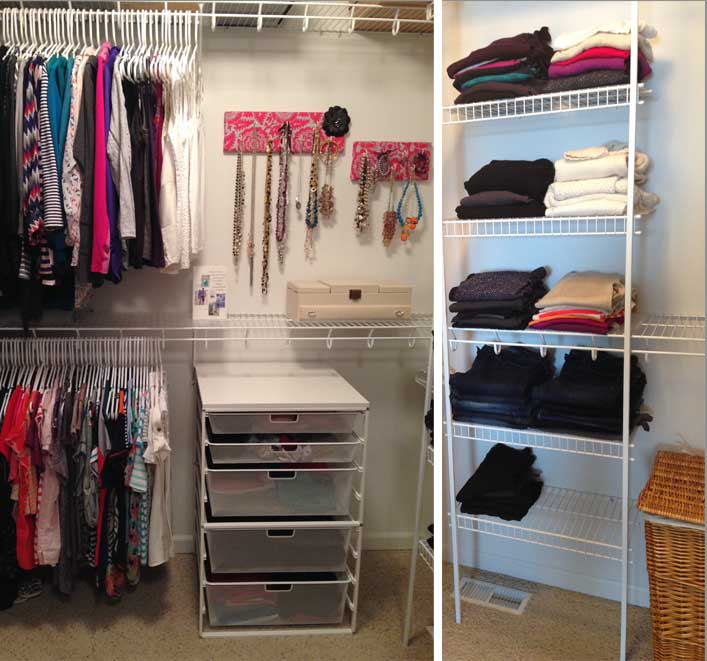
And here it is again after my drawers allowed me to move things around…
Doesn’t it look so much better!! Amazing what five little drawers can do! I’m hoping that anyone who thought my purchase was questionable now agrees it was well worth it! Hubby? you’re agreeing with me here, right?!?! Actually he generally supports my organizational efforts, but let me say there is a reason why his side of the closet remains hidden. It’s better for our marriage if he supports my craziness (OCD) on my half of the closet and I support his craziness (chaos) on his side of the closet!
Shoes are another trouble spot for some. There is always the debate of saving the boxes, tossing the boxes, buying clear shoe boxes… This is an area that I have to say is VERY individual! Some girls are shoe people, some girls have a bad knee and a bunion and keep the shoes simple. (pretty sure you all know which girl I am!)
Actually I’m pretty impressed with that photo – I actually look like a girly-girl with a shoe collection. I know some of you have a shoe collection that could fill your master closet (don’t worry I won’t tell you husbands!) but some of you also fit your shoes in half the space of mine.
I love these shelves from Target – they are about $13 a set, and connect together to stack. Here you see 3 shelves – 2 stacked, and one on its own. One warning with these shelves is that most heels must be stored on the top shelf only. To maximize space I place one shoe facing back and one forward. This allows you to scoot the shoes closer together and generally fit 1-2 extra pairs per shelf.
I also love these boot hangers!

You can now buy them at almost any store that sells closet organization supplies (Target, Bed, Bath & Beyond…) but I buy them at TJMaxx. Sometimes I have to look a few times to find them at TJMaxx, but they are $5.99 instead of $9.99 at other retailers. You simply slide the hanger inside the boot, making them easy to store, while keeping their shape!
You can also see that I have a pair of boots standing to the side of the shelves. These are the boots I have been wearing the most, and I saved the foam inserts that came with them. This is another way to store boots without them falling over… creating clutter and damaging their shape. If standing boots up is your best storage option, but you don’t have the foam inserts you can buy a foam pool noodle. (they’ll be at the dollar store soon, if they aren’t already!) Cut the noodle to the height of your boot, and insert the noodle into the boot to make it stand up and keep its shape.
Scarfs can be another difficult thing to store. Some of you may remember my post a long time ago about using shower curtain rings. I still think this method is great, and very cost effective. However, I wanted something that stored my collection in a smaller amount of space. I am loving this scarf hanger that I found for $5.99 at The ATech Easy Living Store.
I am loving my “new” closet… more storage, less clutter! LOVE! It looks so much nicer… it makes me happy every time I walk in, and it functions WAY better! With the angle of the closet I can’t get a good picture of everything, so this is my pieced together…best I can do photo!!!
And as most of you know, it is important to me that I always keep it real! So….

Here is the “after” photo I took the first time… until I realized that my workout clothes were sitting on top of my nice new drawers! That is where I have been stashing a set of clothes that are too dirty to mix in the drawers with my clean stuff, but I intend to wear again just to clean or work out.

You may also have noticed my husbands dress shirt (that has obviously been worn since it was washed!) that I made sure was cropped out of photos for this post.
And here is another one… Can you tell the difference in the two photos? Can you see why one looks great, the other not so much?
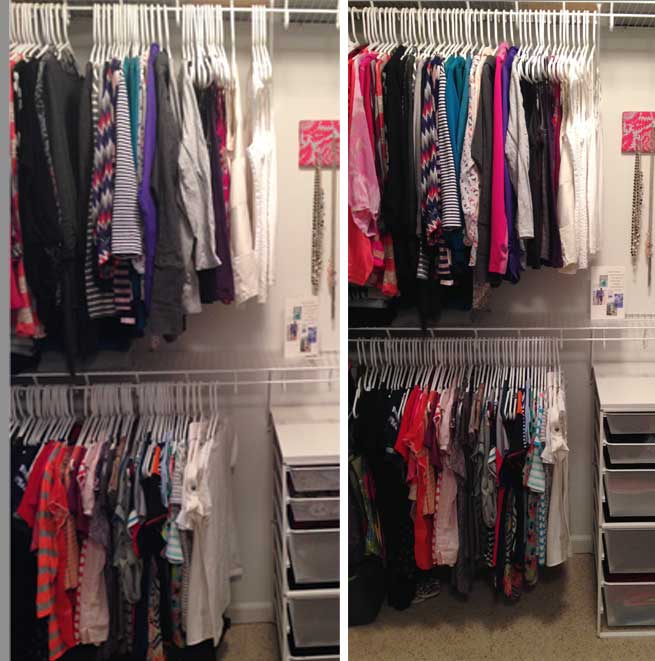
The photo on the left is the first photo I took, and then I realized how messy the hanging clothes looked. I went back and made sure all of the hangers were straight and evenly spaced. Needless to say, NOT something I do on a regular basis!
Just remember when you are reading my blog (or looking at a magazine, surfing the web) that the photos you are seeing are how a space looks in its best possible state. None of us actually live like that on a daily basis.
Yes, my closet is usually clutter free and pretty organized. However, in order to take pictures like I used in this post, I would need to do a little “tidying up” on an average day. This is a useful tool though too! If you never feel like your organizational efforts turn out as visually “fancied” up as your inspiration, take a picture – it is amazing what you see in a photo that you never noticed before!
I hope at least a few of you have been inspired to create some order in your master closet! If you have some fun jewelry you still aren’t sure what to do with… My next post will be a super fun jewelry display I made for a client! I can’t wait to share it with you all!