
Today is a first for my blog – I am featuring a project I completed for a client instead of myself! I know, some of you didn’t even know I have clients. I’ve kinda been keeping it to myself! I know, secrets don’t make friends, but sometimes proper timing is acceptable right?! Well, last fall when I launched my blog I was too scared to widely voice my dream that it would one day become more, and by someday I meant in several years. Sometimes I forget that my life is not meant to follow my plans, for my good Lord is orchestrating His will at all times. Over the last year I have been blessed with opportunities to have fun ordering spaces in client’s homes, as well as my own. I never imagined that these opportunities would arise so quickly… and my dream is still growing!
Well, Jase starts preschool tomorrow, for which I think he and I are equally excited! It is only two mornings a week, but I am feeling the growing independence of all my children and have decided to invest a little more into OH! Organized Housewife and all it is becoming. It has been so much fun! So, if you’ve ever thought “I want her to do that at my house!”… well, I’d LOVE TO! If you’d like a little more information on what OH! Organized Housewife is about outside of this blog, you can check out my Organizational Services page. You can also submit the form at the bottom of that page to request that I contact you to discuss your organizational needs.
Periodically I will continue to post projects that I have been working on with clients, with their permission of course! And don’t worry, I will still be sharing all my little steps and processes so you can be inspired and tackle projects all on your own!
Now, for a little solution to storing all the dresses and shoes and purses and jewelry… that our little girls love as they transform themselves into Cinderella, Sleeping Beauty, Ariel and all the beautiful princesses they can imagine. I love to watch young girls play dress-up, and remember feeling pretty in my mom’s old dresses and over-sized heels as a child. But as cute as they look, their play space inevitably ends up in shambles! It kinda resembles the closets of their mothers after we – I mean you all 🙂 get ready for a date night!
I saw this adorable photo online and knew my client would love it!
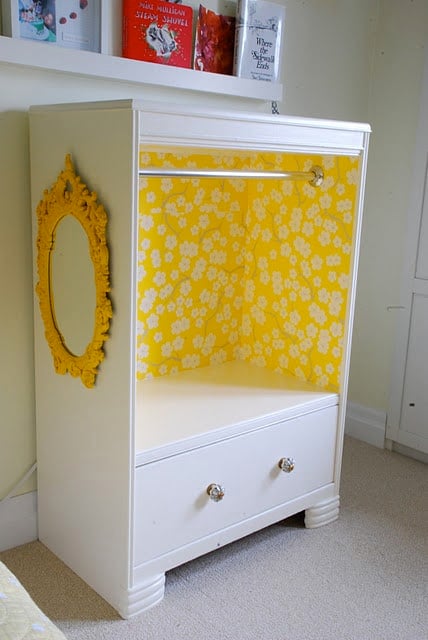
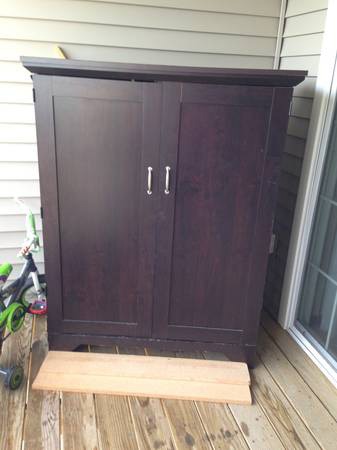
Who wouldn’t love it – right! After some time reorganizing her playroom, and adding some additional storage pieces she decided she wanted one of these dress-up stations for her girls. I was super excited!! I began stalking Craigslist for an old dresser to take apart, but you know me – I wanted to find it for less than $35, preferably more like $25. Well, I found this perfect piece for $30!
Here is the inside…

Yes, it needed some serious TLC, but I knew it would be perfect. I didn’t want my client to pay for something in great condition, when it was going to get an overhaul anyway. I knew it just needed some Annie Sloan paint and cute paper! My hubby on the other hand was a little skeptical, but he was a rock star and helped me pick it up from its original owner. And by that I mean he carried it down a huge flight of stairs, loaded in the van and then drove his car home with our three children crammed in the back seat fighting while I drove the van home with just my phone and a radio! Love that man! 🙂
For those of you that are confused, OH! Organized Housewife really is all about organizing. Clients and I usually work on sorting and ordering spaces, but making them pretty too is icing on the cake! I love when storage and organization allows me to be a little creative and do a DIY project.
My first job was to get rid of the doors on the cabinet. They were in pretty bad shape, and I didn’t want them to hide all the cute shoes and dresses it would be storing. Next I ripped of the back panel – what was left of it. Really with the doors and back panel gone it already looked much better.
Next came a few good coats of Annie Sloan Chalk Paint in Pure White. Normally I would have only done two coats, but the cabinet was not real wood – it was a super dark laminate. Yes, I painted an entirely laminate piece of furniture and it worked – no sanding, prep or anything! I think the dark color was the root of the problem paired with the Pure White paint color. I needed three coats to feel like I had good coverage, compared to my normal two coats.
After the paint dried, I used the Annie Sloan clear wax. Some of you know that I don’t traditionally think Annie Sloan wax is necessary, but with Pure White paint I think it is well worth the money. Other waxes have a yellow tint to them, and will more significantly alter the color of the paint. I used sand paper and steel wool to buff the wax to a shiny luster, and added some distressing. For more information on my process of using Annie Sloan Pain and why I love it, check out my post on Jase’s dresser.
Did I mention that my hard drive crashed last week. Long story short I lost a lot of good pictures for blogging. So, please bear with me when I should have a photo and I don’t. I did have photos of this part of the process, but they’re lost forever. I didn’t cry (I’m really not a crier about much at all) but I was close! Moving on…
I also purchased a 4×8 sheet of hardboard wall panel from Lowes ($9) and had them cut it for me to the exact size I needed to replace the original (destroyed) backing of the cabinet. I then covered the hardboard with really cute contact paper, in a light blue color that works well in my clients playroom. I simply adhered strips of the contact paper to the hardboard using its own adhesive backing – super easy! After tacking the backing to the cabinet, here is the progress…

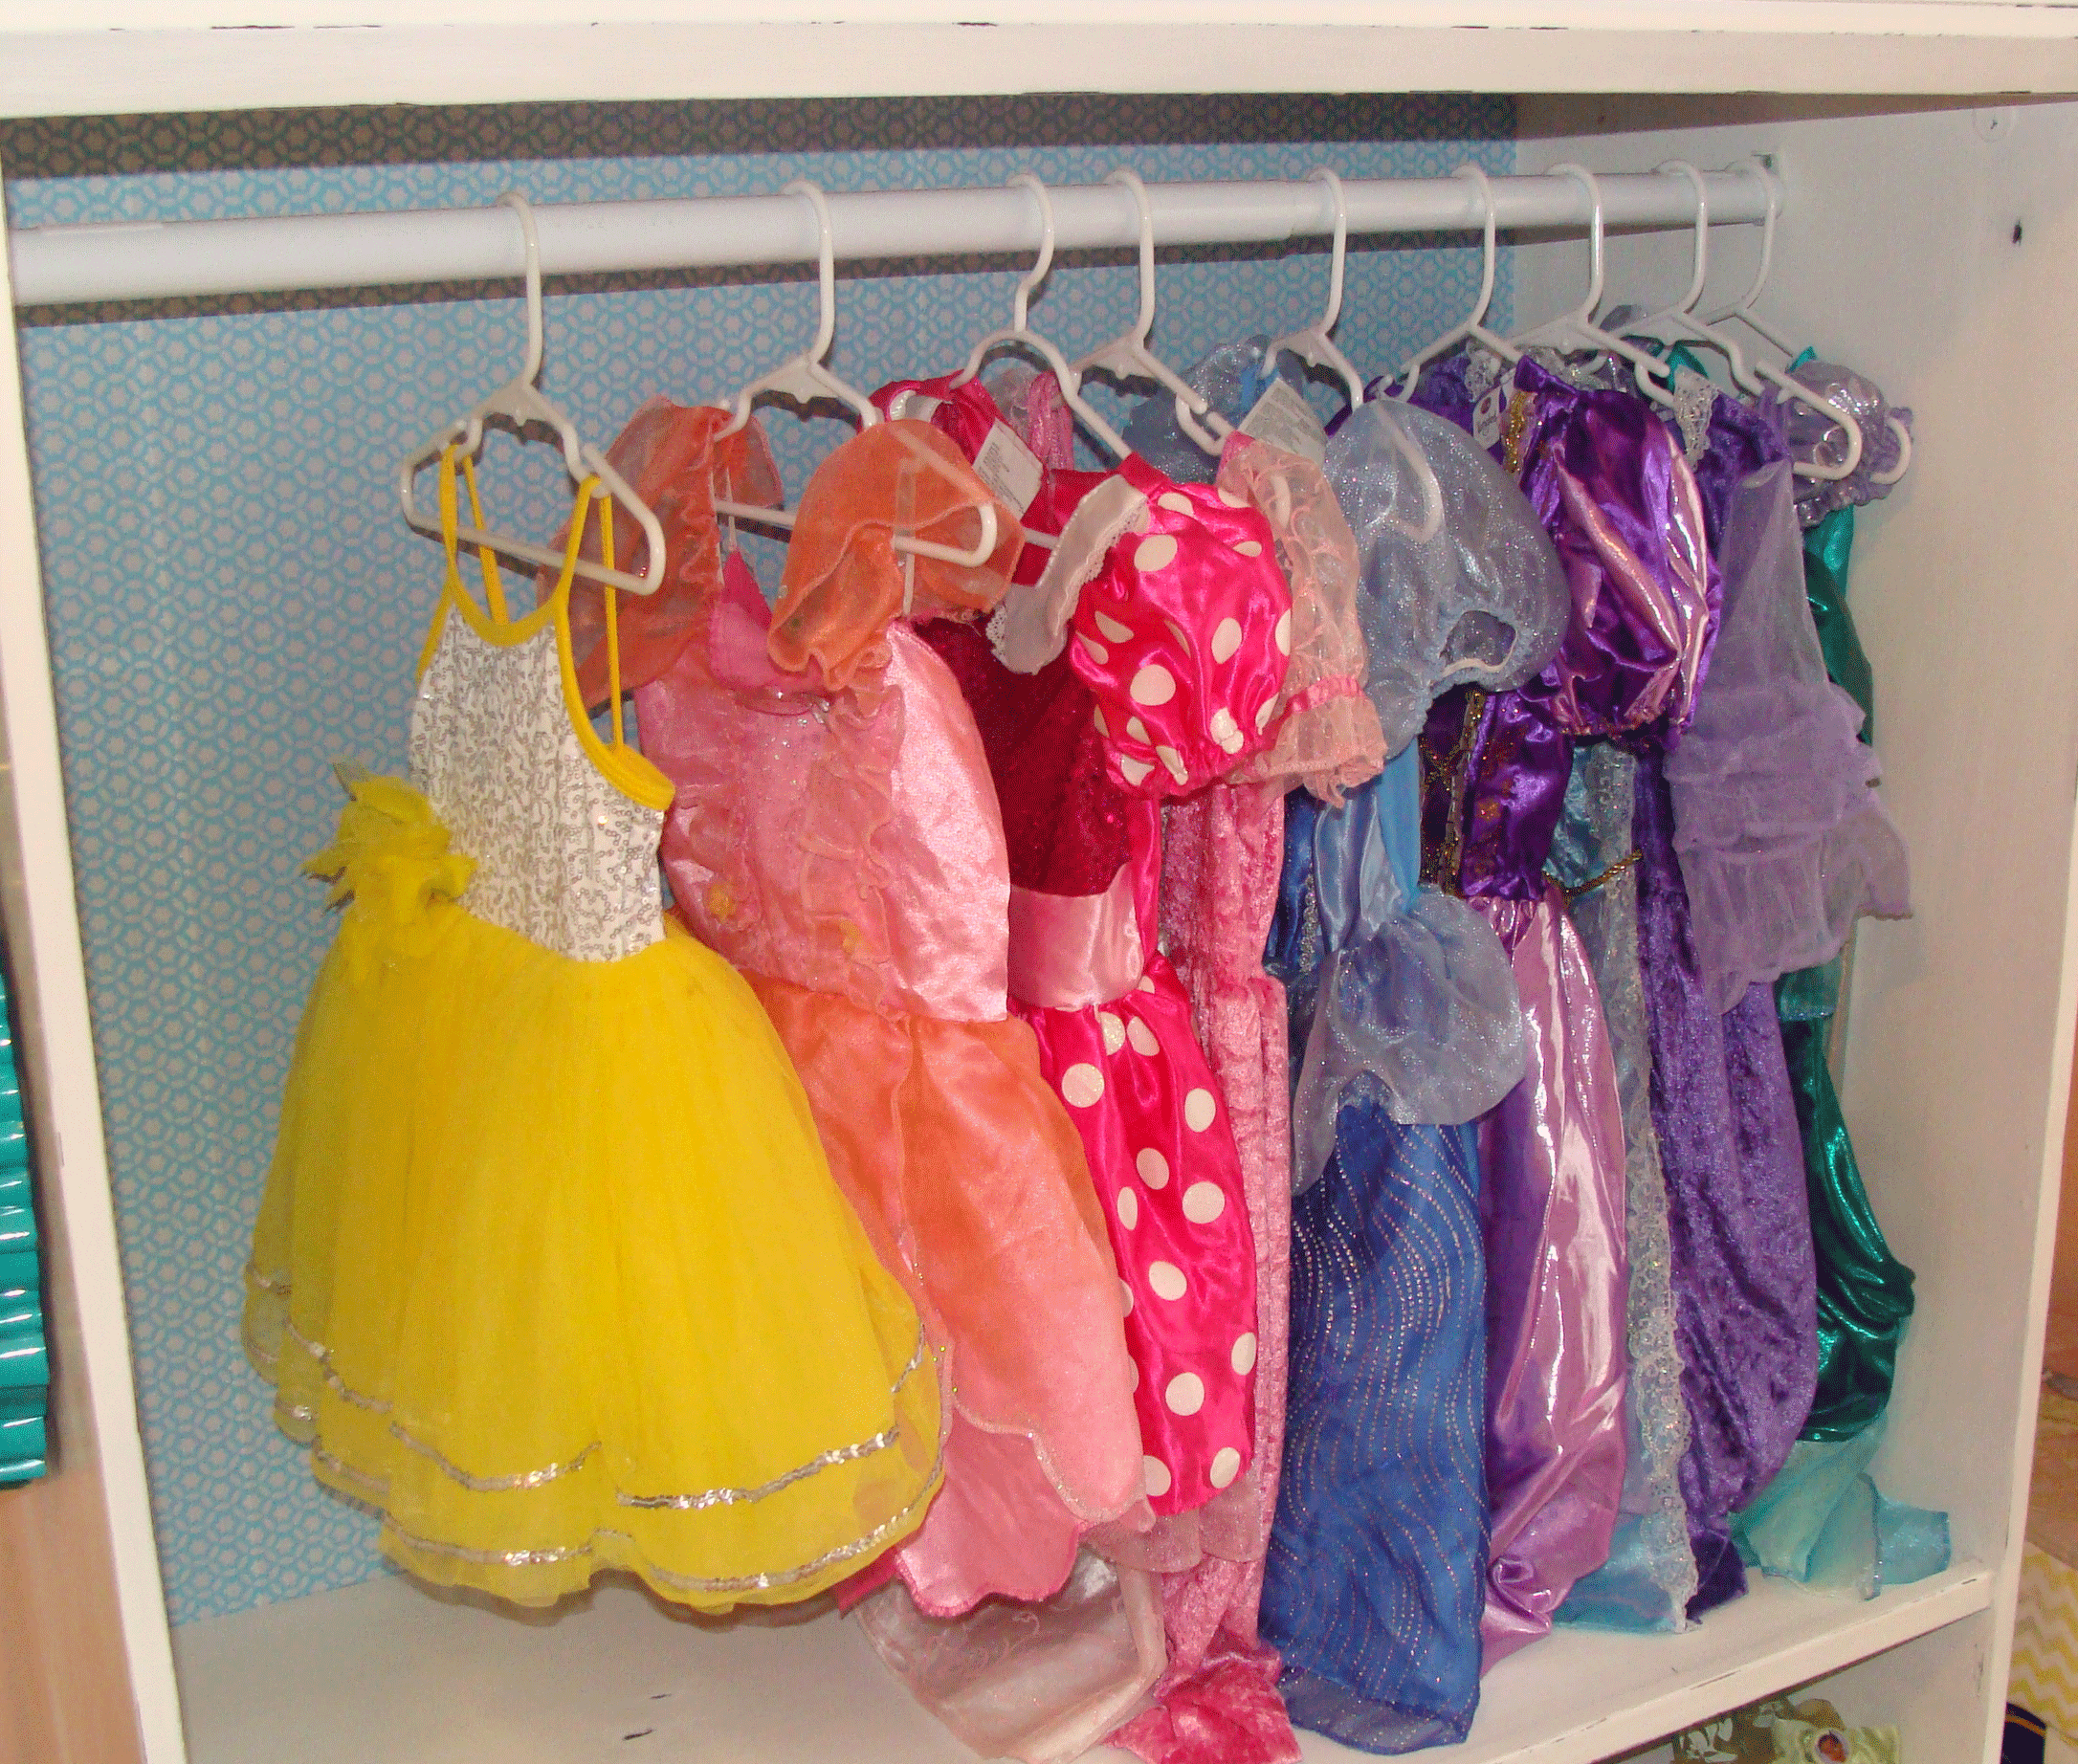
I also got a clothes rod from Lowes (like the one I used in our laundry room) and added it to the inside of the cabinet to hang dresses. I have to clarify here that I totally lucked out and my father-in-law was in town the weekend I was working on this. So, when I say that I tacked on the backing and hung the rod I really mean my father-in-law tacked on the backing and hung the rod! I know I could have done it, but he just makes things look easy!

Last, I added some distressed white flower drawer pulls I found at Hobby Lobby. I knew it would be impossible to find a bar pull that I liked and fit perfectly in the original holes, so I decided to go with two pulls on each drawer. I love them!

With the paint dry, the pretty paper backing secure, rod hung and drawers with pulls in place I was ready to make my delivery. I was one part super excited – hoping my client would love it, and one part totally freaked out that she would be really disappointed after that cute inspiration photo. Fortunately she very kindly said she loved it! What do you think?
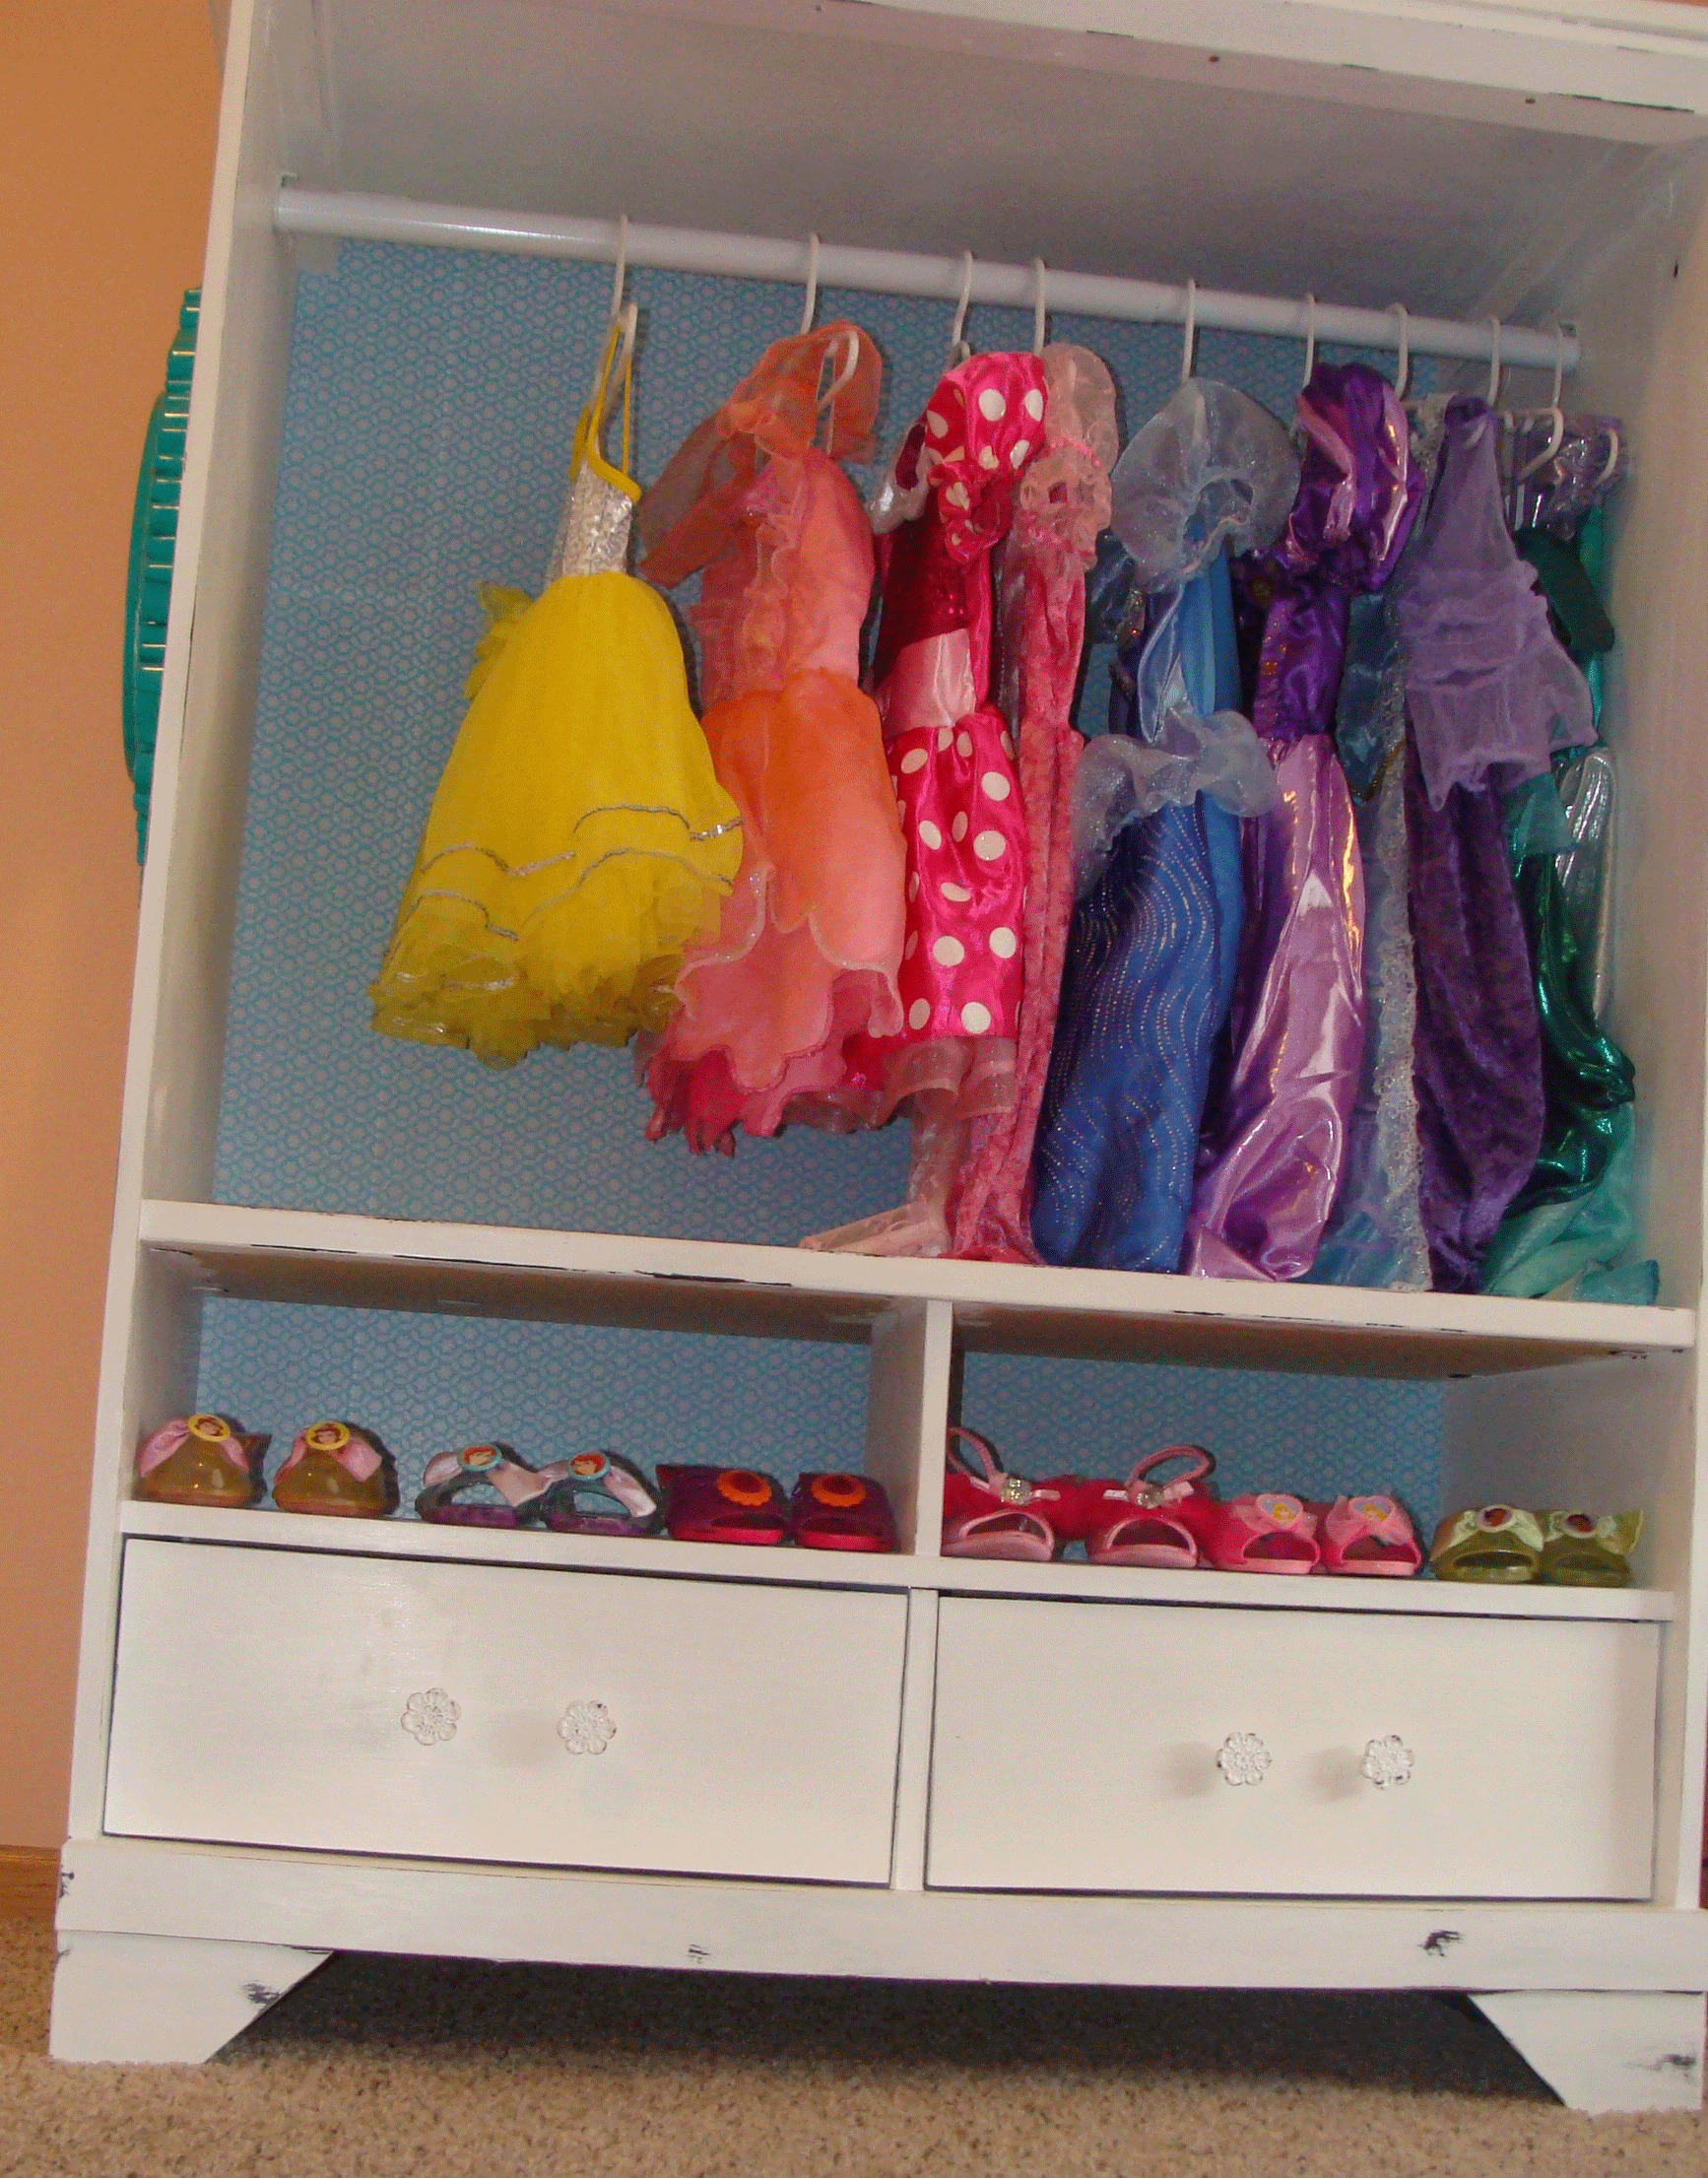
After delivery to my client, I put her girls’ dress-up clothes in place and hung a super cute mirror from Hobby Lobby on the side. Girls need to be able to see themselves when dressing fancy of course! I hung the mirror with 3M velcro photo hanging strips.
I hung all of their dresses by size and color – aren’t they cute!
In the original cabinet there were shelves for DVD, DVR or stereo components. I knew they would be perfect for pretty shoes and princess slippers!
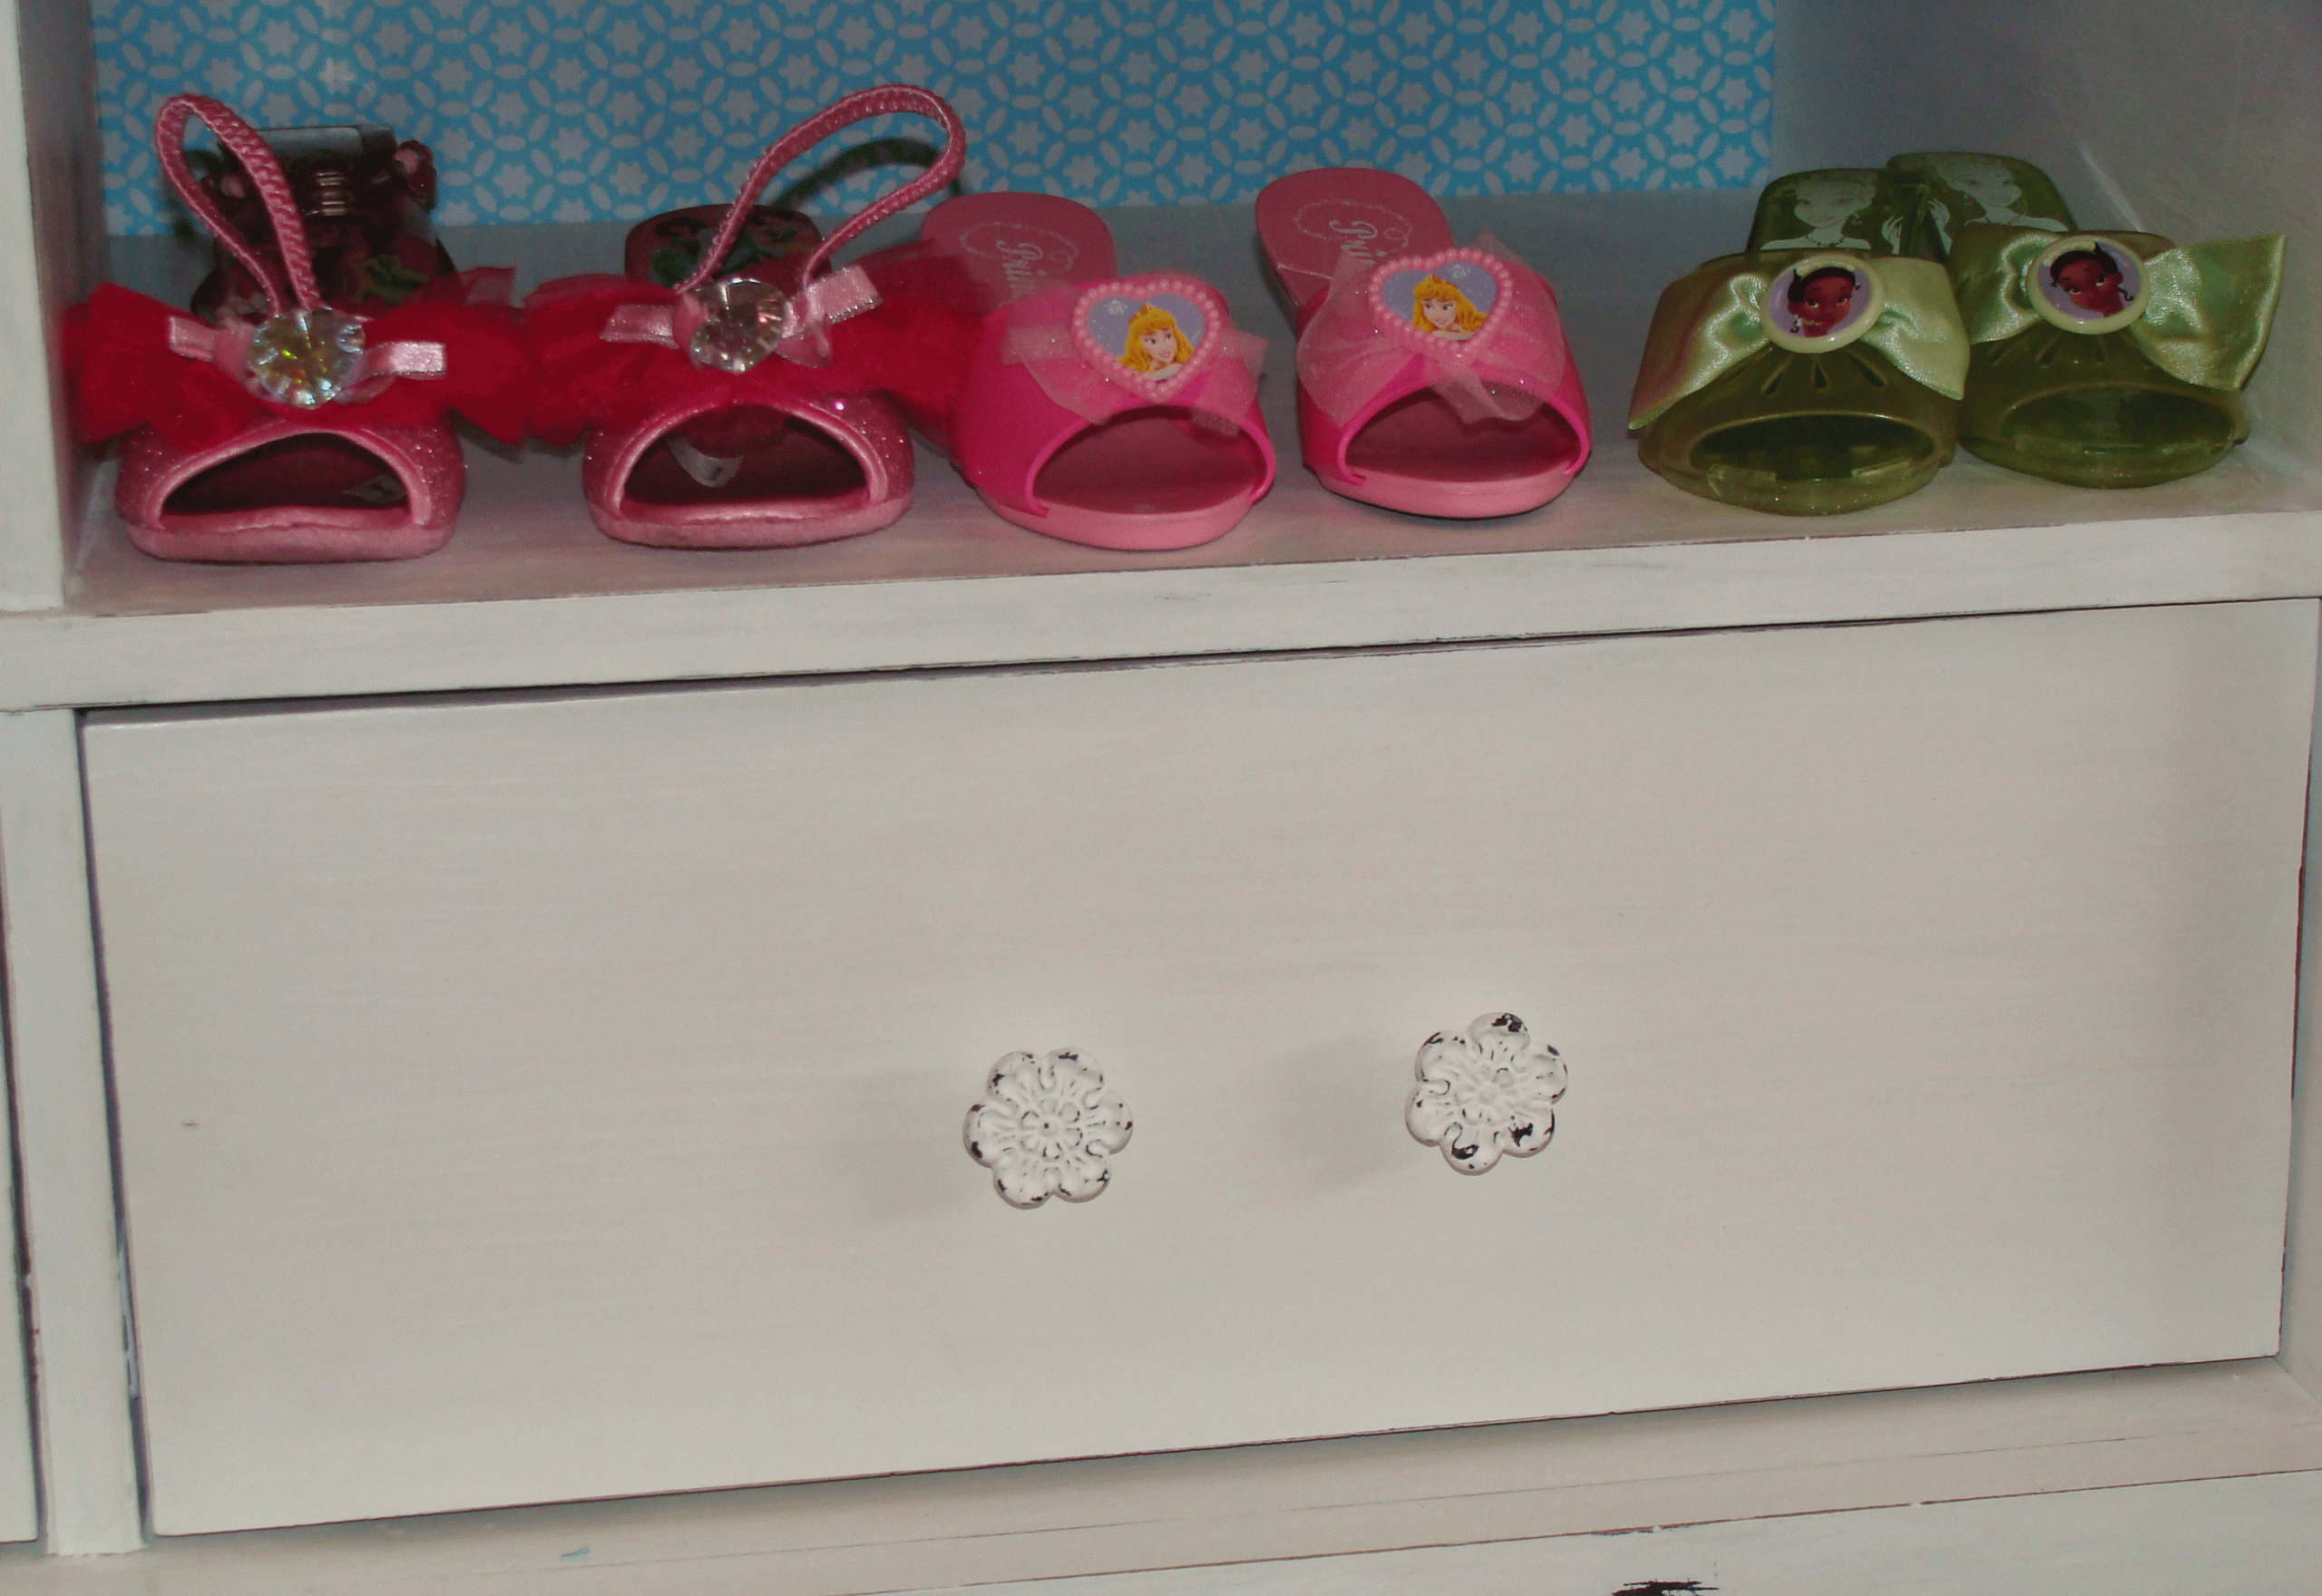
And the drawers are perfect for purses, jewelry and other accessories that are hard to neatly display on a regular basis.
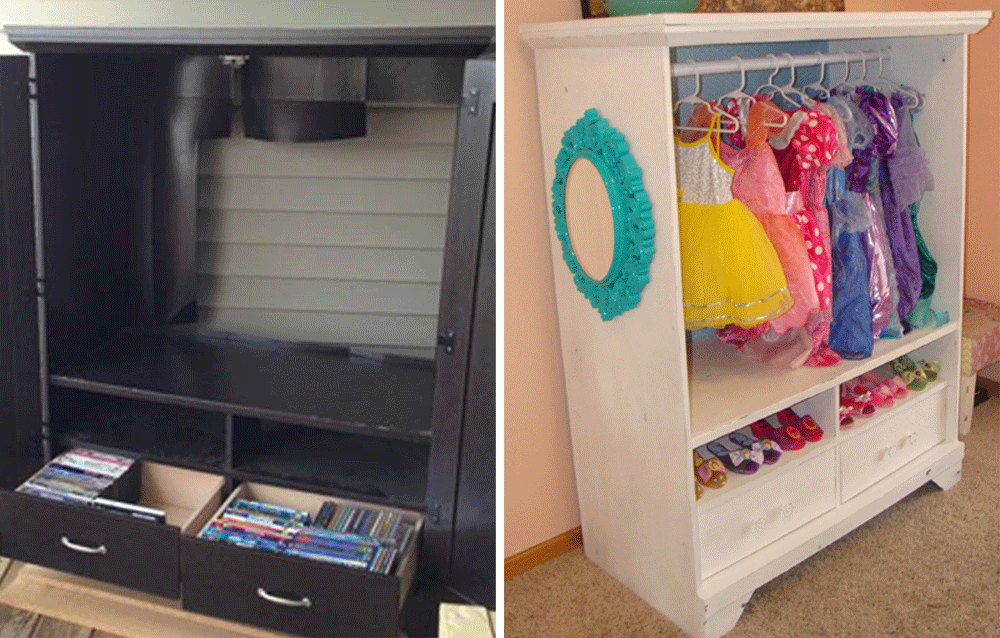
And finally… a before and after…
The greatest joy for me was watching the little girls that get to use this dress-up station any day they want. Three little girls gathered around excitedly as we carried the cabinet in. Then they helped me hang up dresses, and find all their dress-up stuff. They didn’t want to go outside and play, but stayed in to help sort accessories into drawers, and line up shoes. I think they felt like special little princesses – can’t beat it!
This client project was super fun, especially for my creative side. My passion however is helping people order where they live, even if it doesn’t look “fancy”. For my next post I’ll show you a closet project that is all about organization; from planning the layout, to picking storage pieces, to putting it all in place!