
As I shared in my last post about our dining room, I wanted to add some interest to the room with window treatments, without spending a ton of money on custom roman blinds. I decided that making a cornice board for each window would be the best way to add some pizzazz, hide our slat blinds, and keep the expense to a minimum.
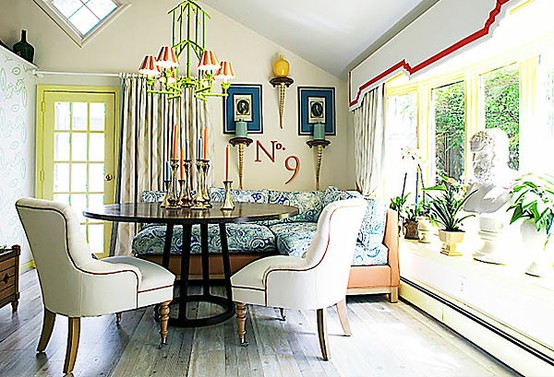
As I usually do before I undertake a big project, I gathered some inspiration photos from the internet to get an idea of what I wanted them to look like. Here are some gorgeous cornice boards!


I ran across a lot of cornice boards that looked very “from my grandma’s house”, were overly bulky, and lacked any great character without incorporating curtains as well. Here are a few examples of what I WASN’T looking for.
Source
Source
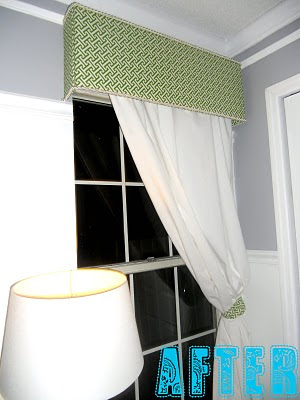
I decided I wanted the cornice boards to be slightly smaller (in terms of how tall they would be) than average, and I wanted more shape than just a rectangular box. Although I like the fabric and color of this DIY cornice board, I don’t like the overall look.
Source
I really love these…

Source
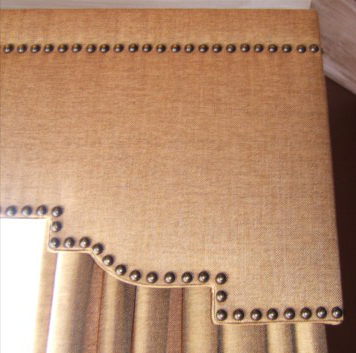
And I loved the nail head trim on these to accentuate the shape…
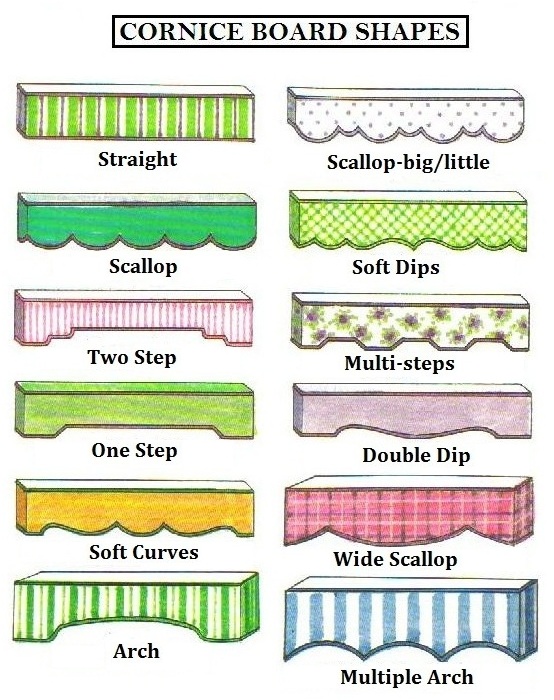
I found this reference sheet of shapes for cornice boards. It gave me a lot of ideas for adding detail and a little character.
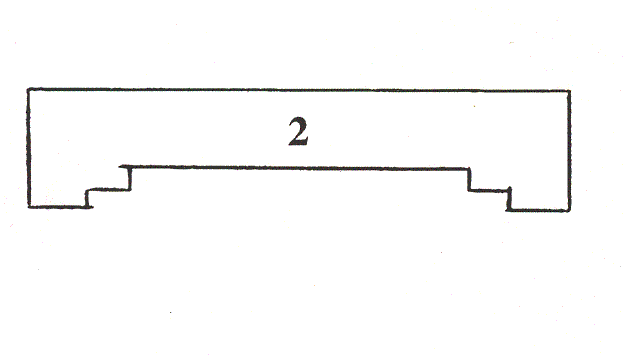
I decided that although I liked the curved cornice boards, without a jigsaw (and some experience using one) I should stick to something with right angles that would be easy for me to construct. So I picked this design…
Next I needed to pick a fabric… A process that is never easy for me! I ordered a bunch of fabric swatches, and tried to find something that would be super cheap. I decided that although being cost effective was my goal, having cornice boards that looked cheap would only annoy me more than no window treatment at all. I settled on this fabric from Ballard Design.

I was able to order it at 20% off, and justified the expense knowing that I would be making the rest of the cornice board for almost nothing. I also calculated the fabric order very carefully so I didn’t order extra fabric – which is also risky!!!
I then set out to make the frame or box, that would provide the cornice board with my desired shape. I went to Lowe’s and had them cut cheap plywood into the sizes I would need. I requested a lot of cuts, and I luckily had a really nice guy help me that didn’t complain or even give me a dirty look! If you do need more than a couple of cuts at the hardware store (I don’t have a table saw so I rely on them to rip large pieces of cheap wood to keep the cost down on projects) I strongly recommend going to the store with a detailed cut list. If you can quickly tell them how many cuts you need and what the exact measurements are they are much more likely to help you without charging extra.
I had the nice guy at Lowe’s make cuts for me for the large portion of the cornice board and then smaller 3.5 inch strips for the sides of the box. I just kept those 3.5 inch strips the full 8 feet long, knowing I could use my miter saw to cut those pieces to exact lengths.
I also purchased some 3” x 3′ pieces of project lumber (which is actually 2.5″) to create the step down detail I wanted on the ends of the cornice boards. I also cut these on my miter saw.
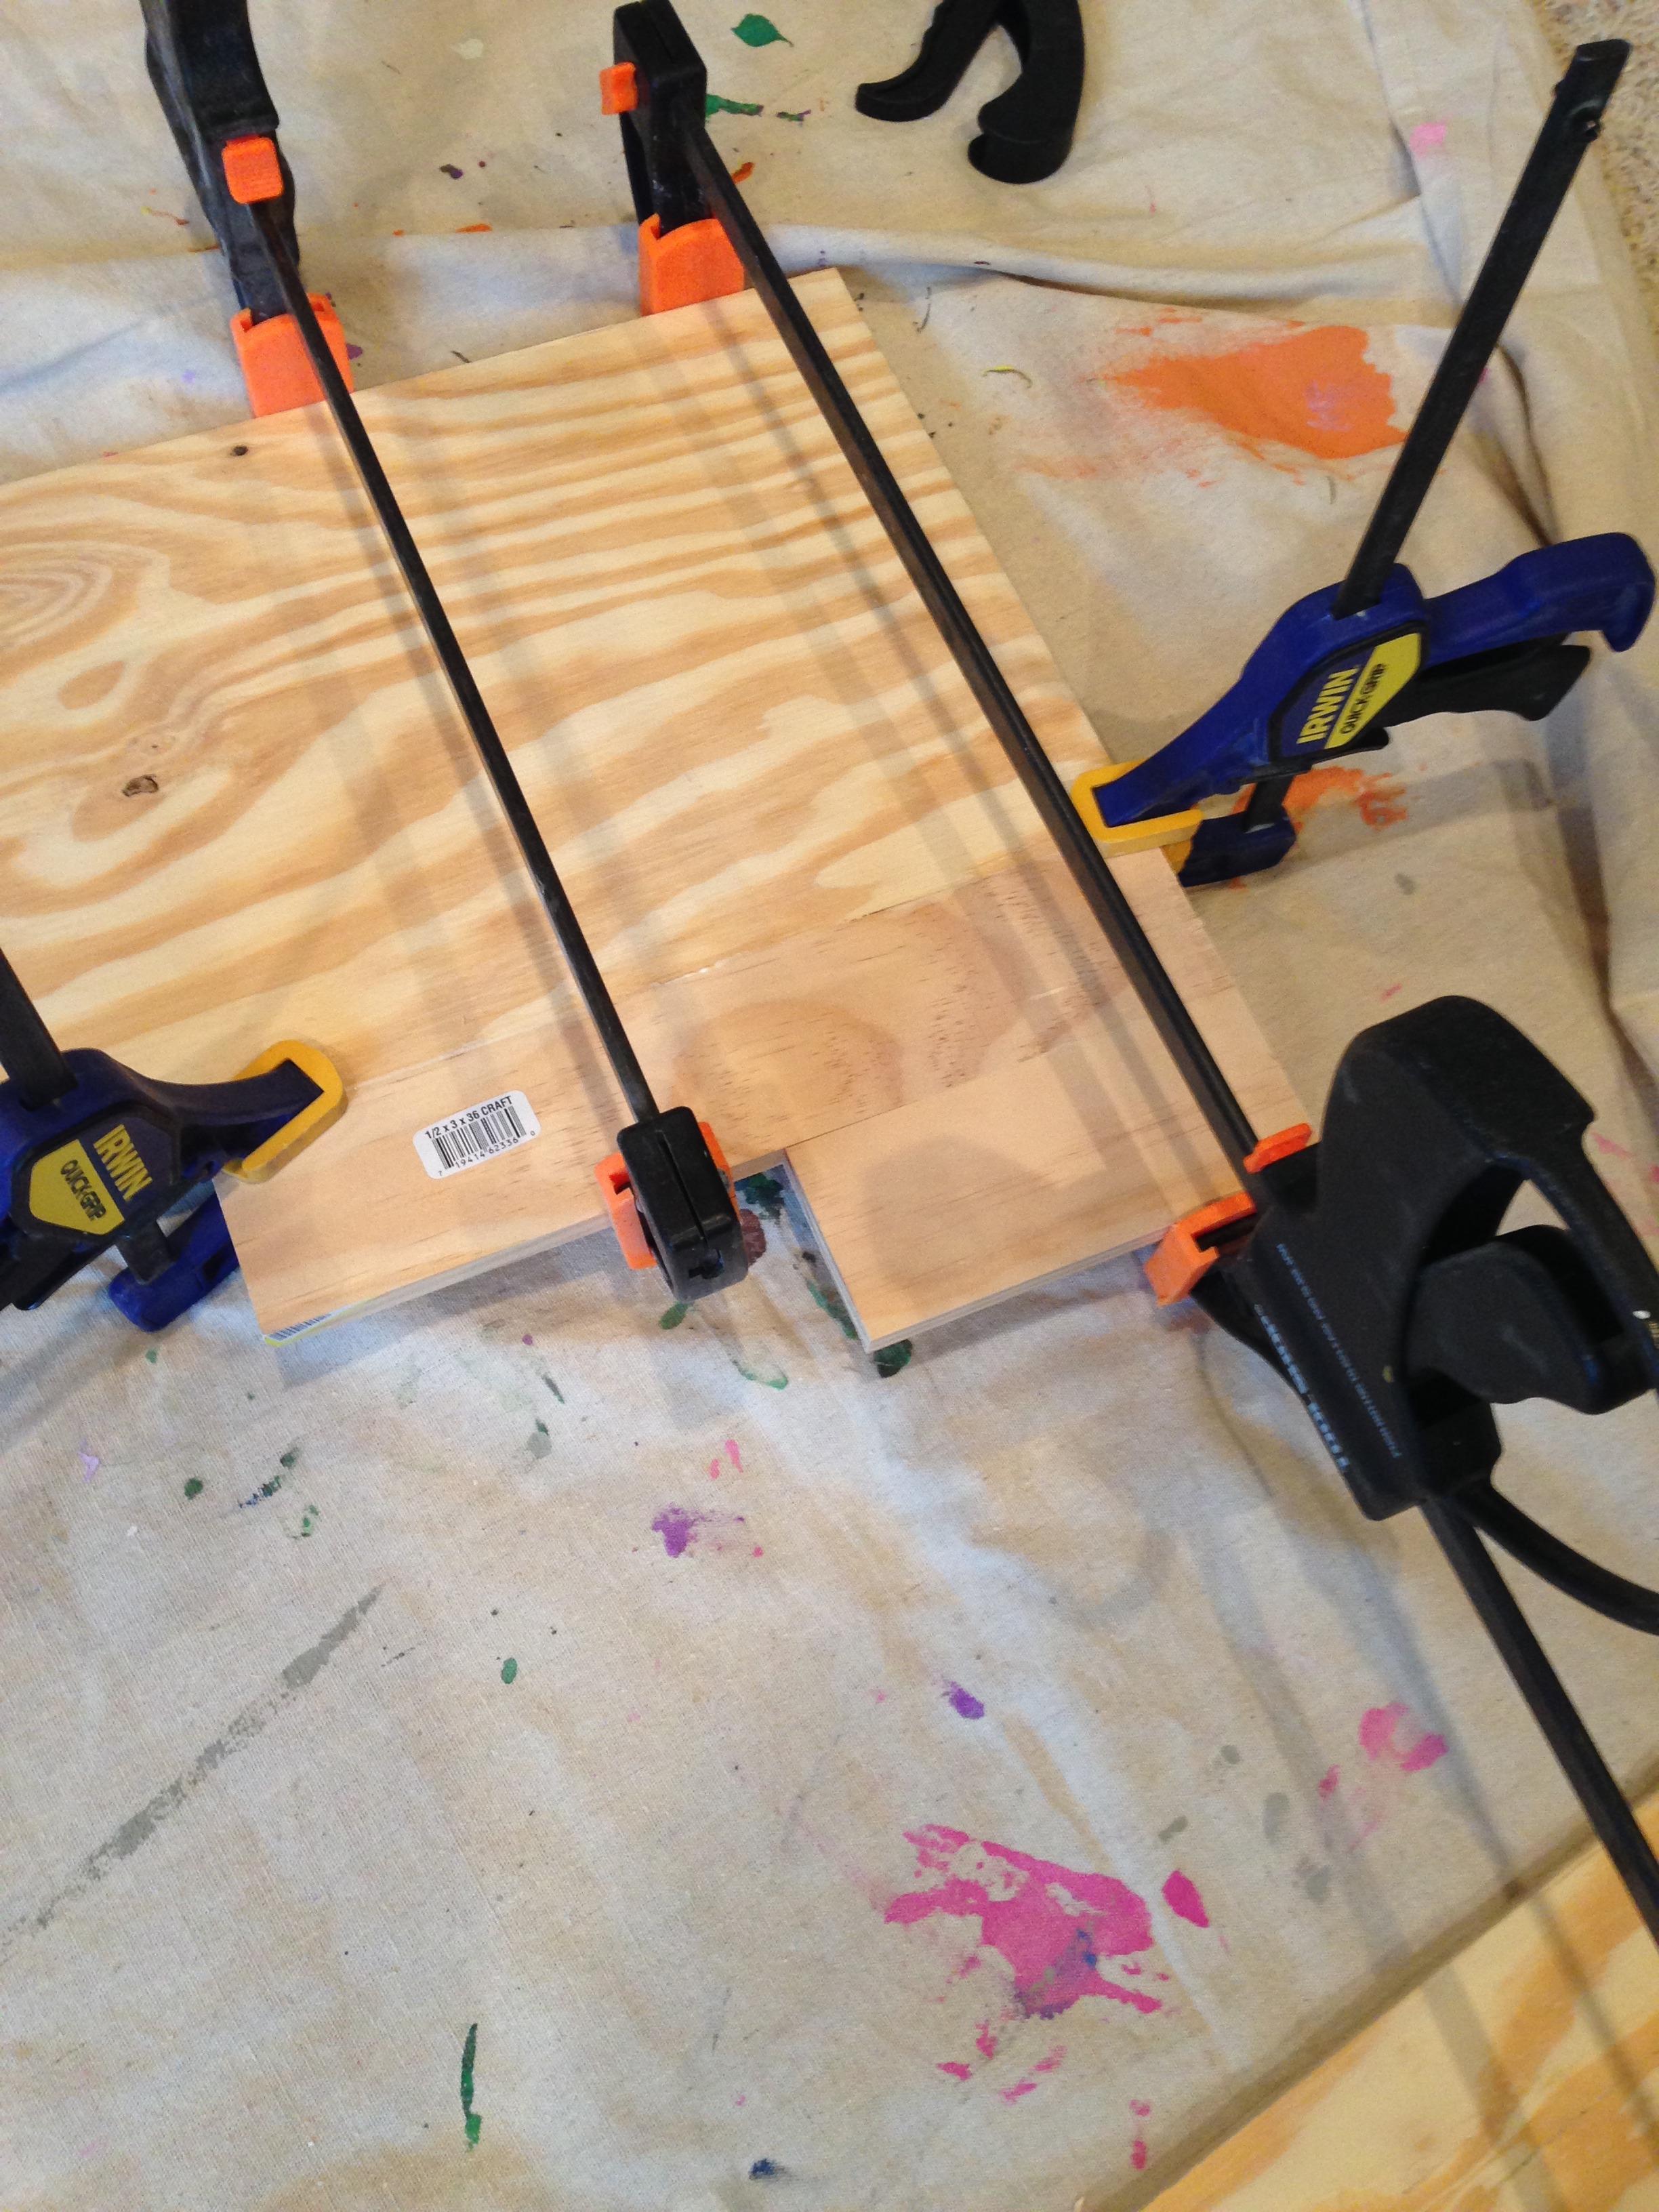
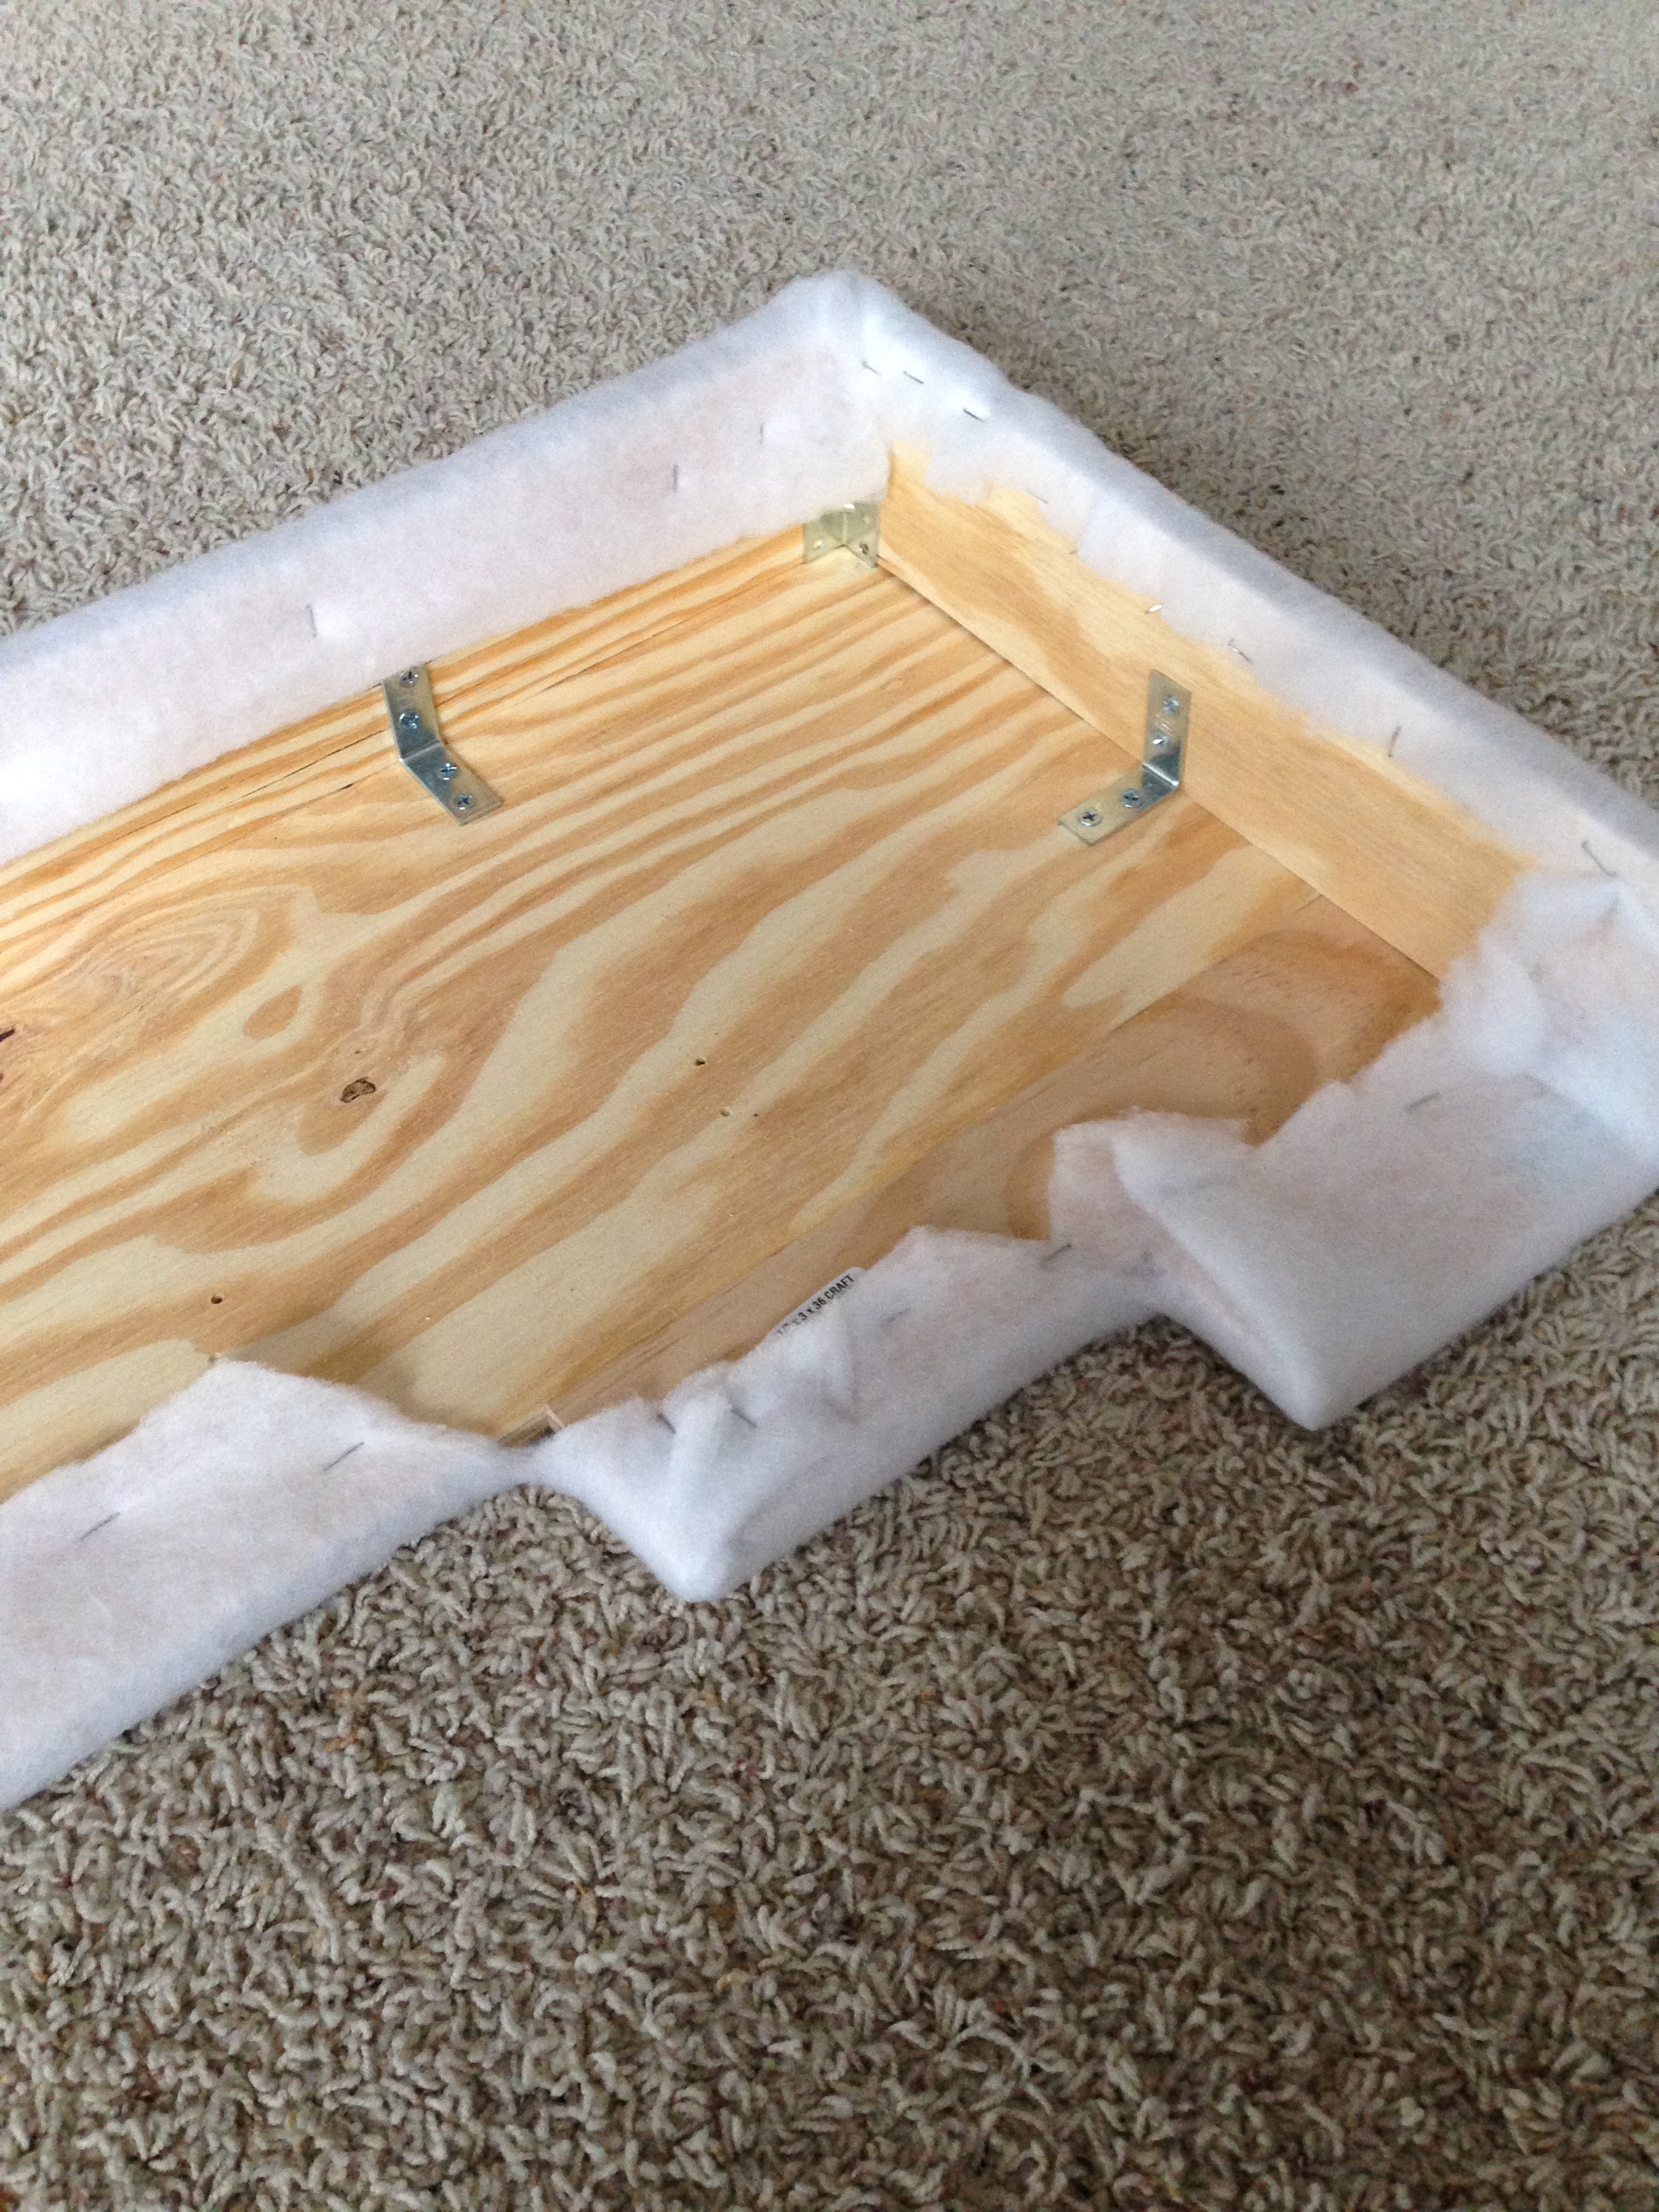
Once I had all of my lumber cut to the correct lengths (see below) I began to assemble the face of the cornice board using wood glue and wood clamps.
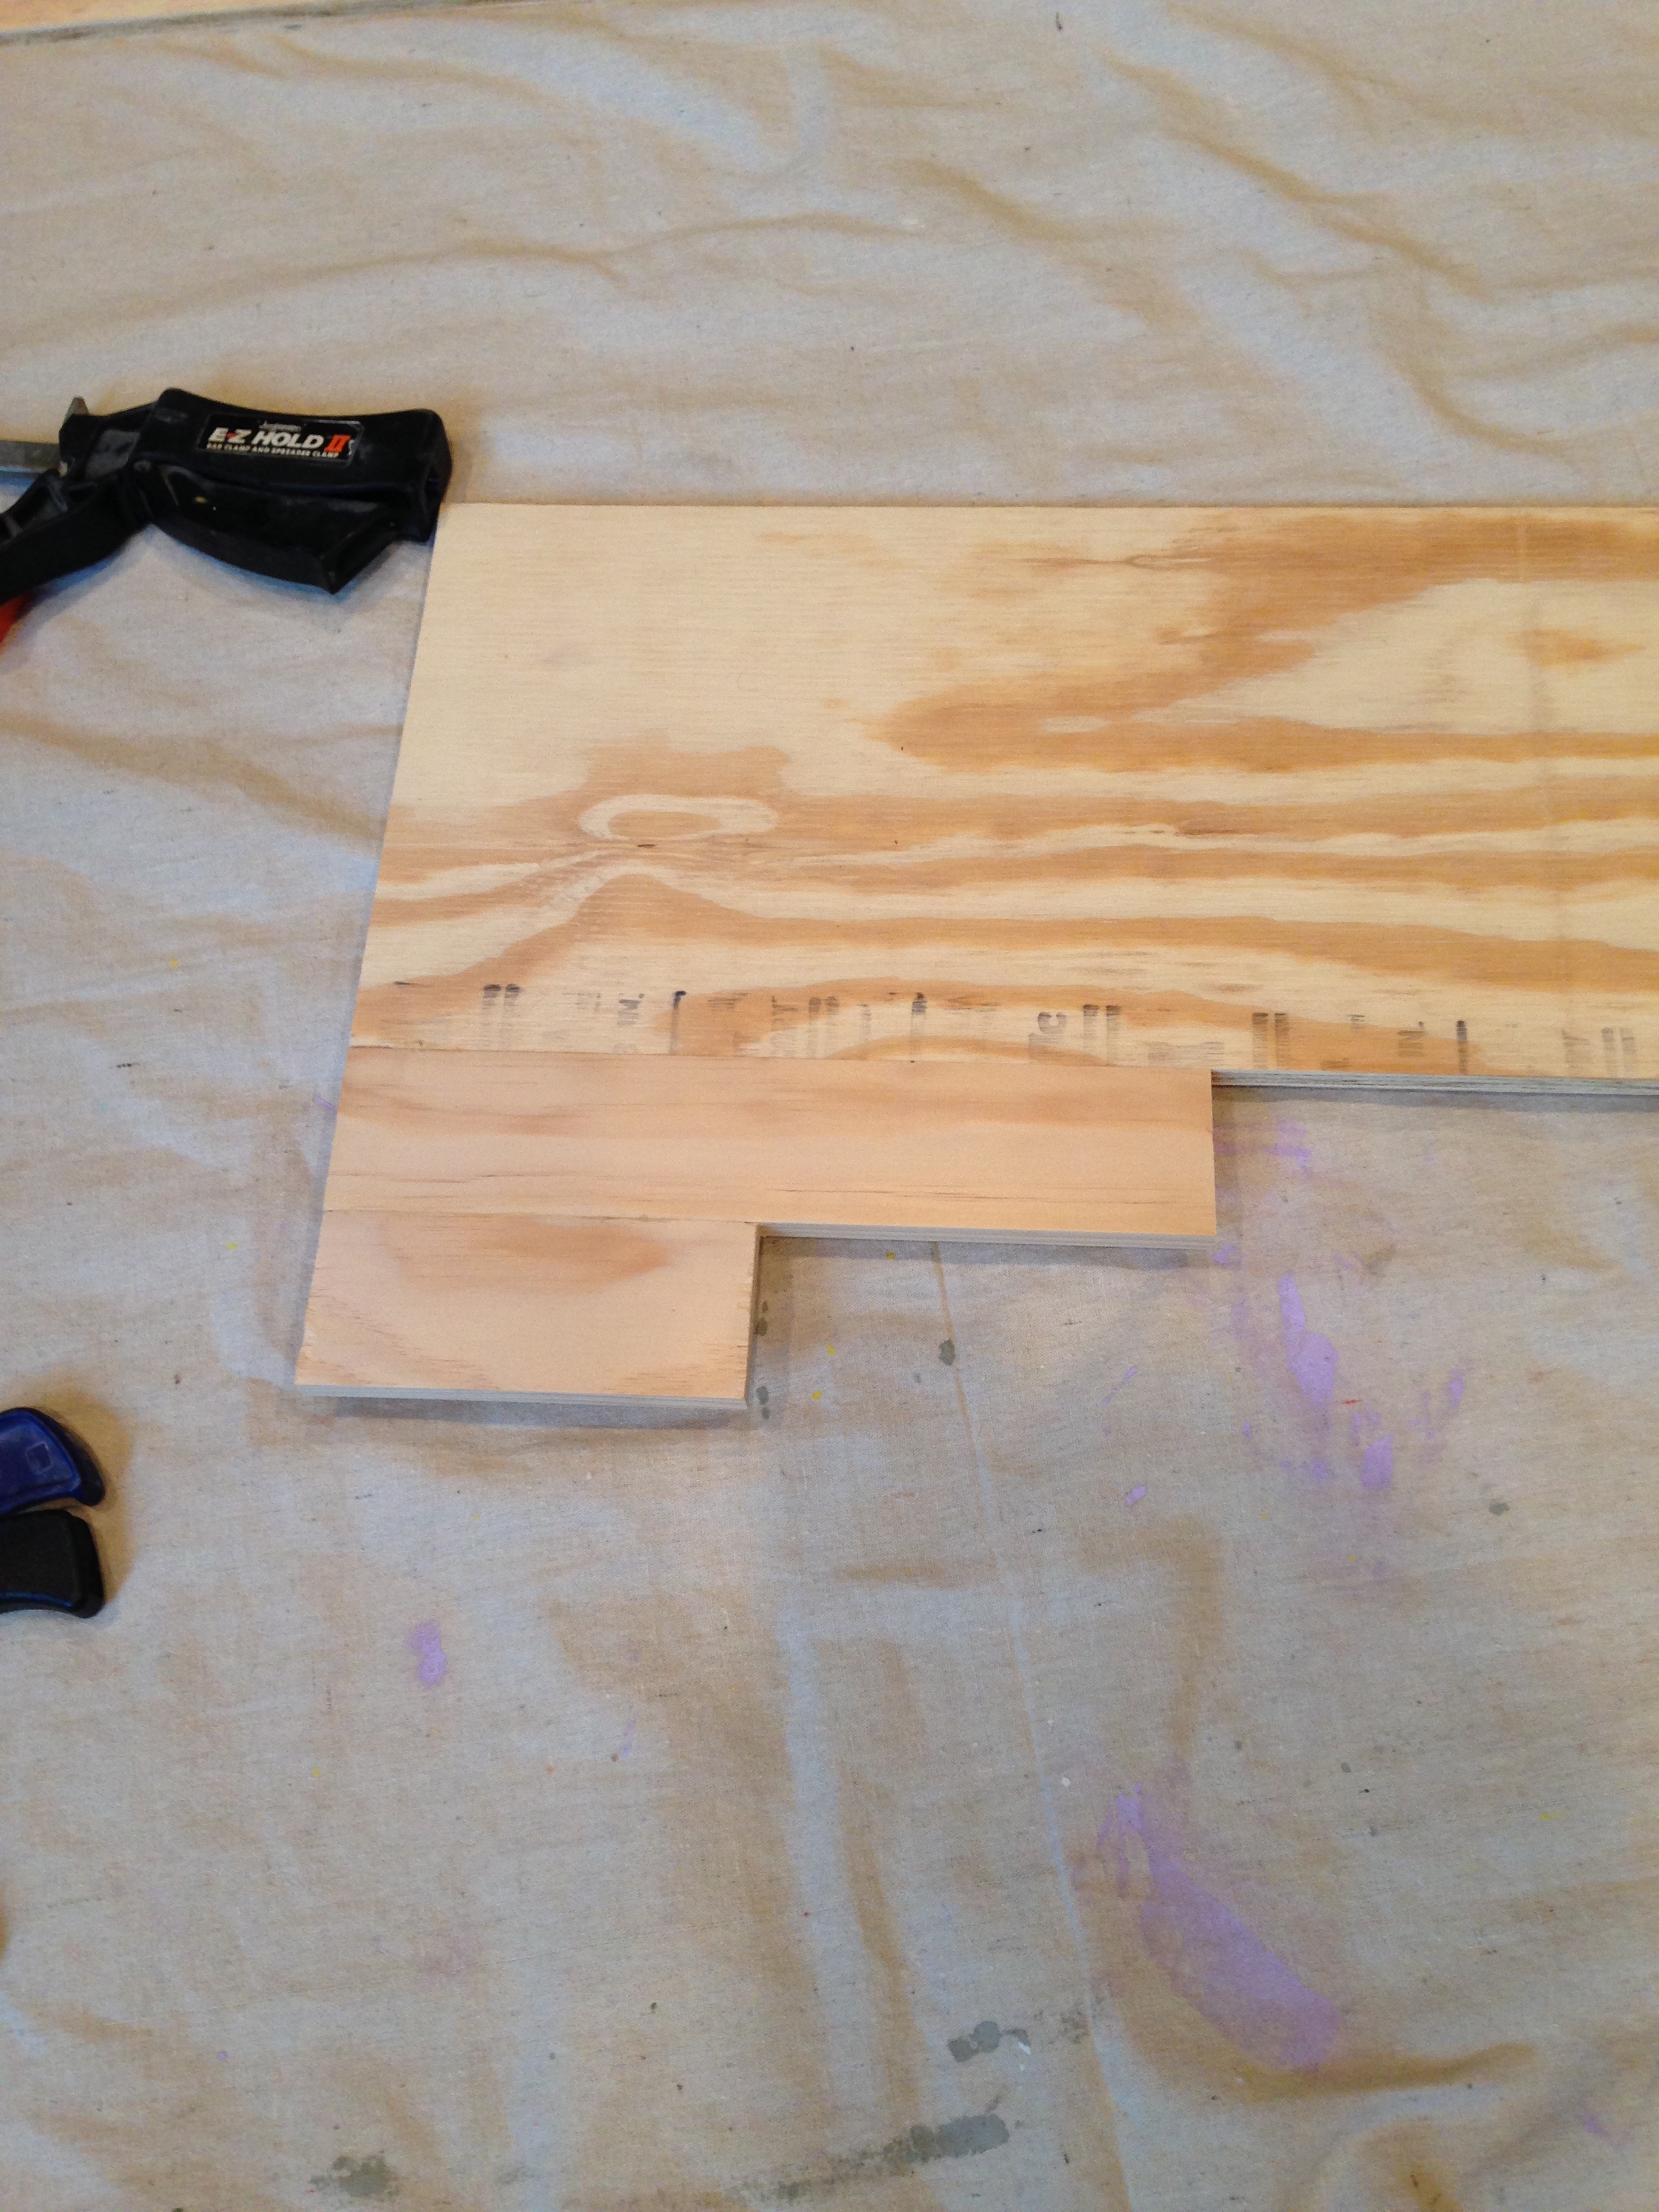
Once the glue dried and I removed the clamps, this is the shape I was left with.
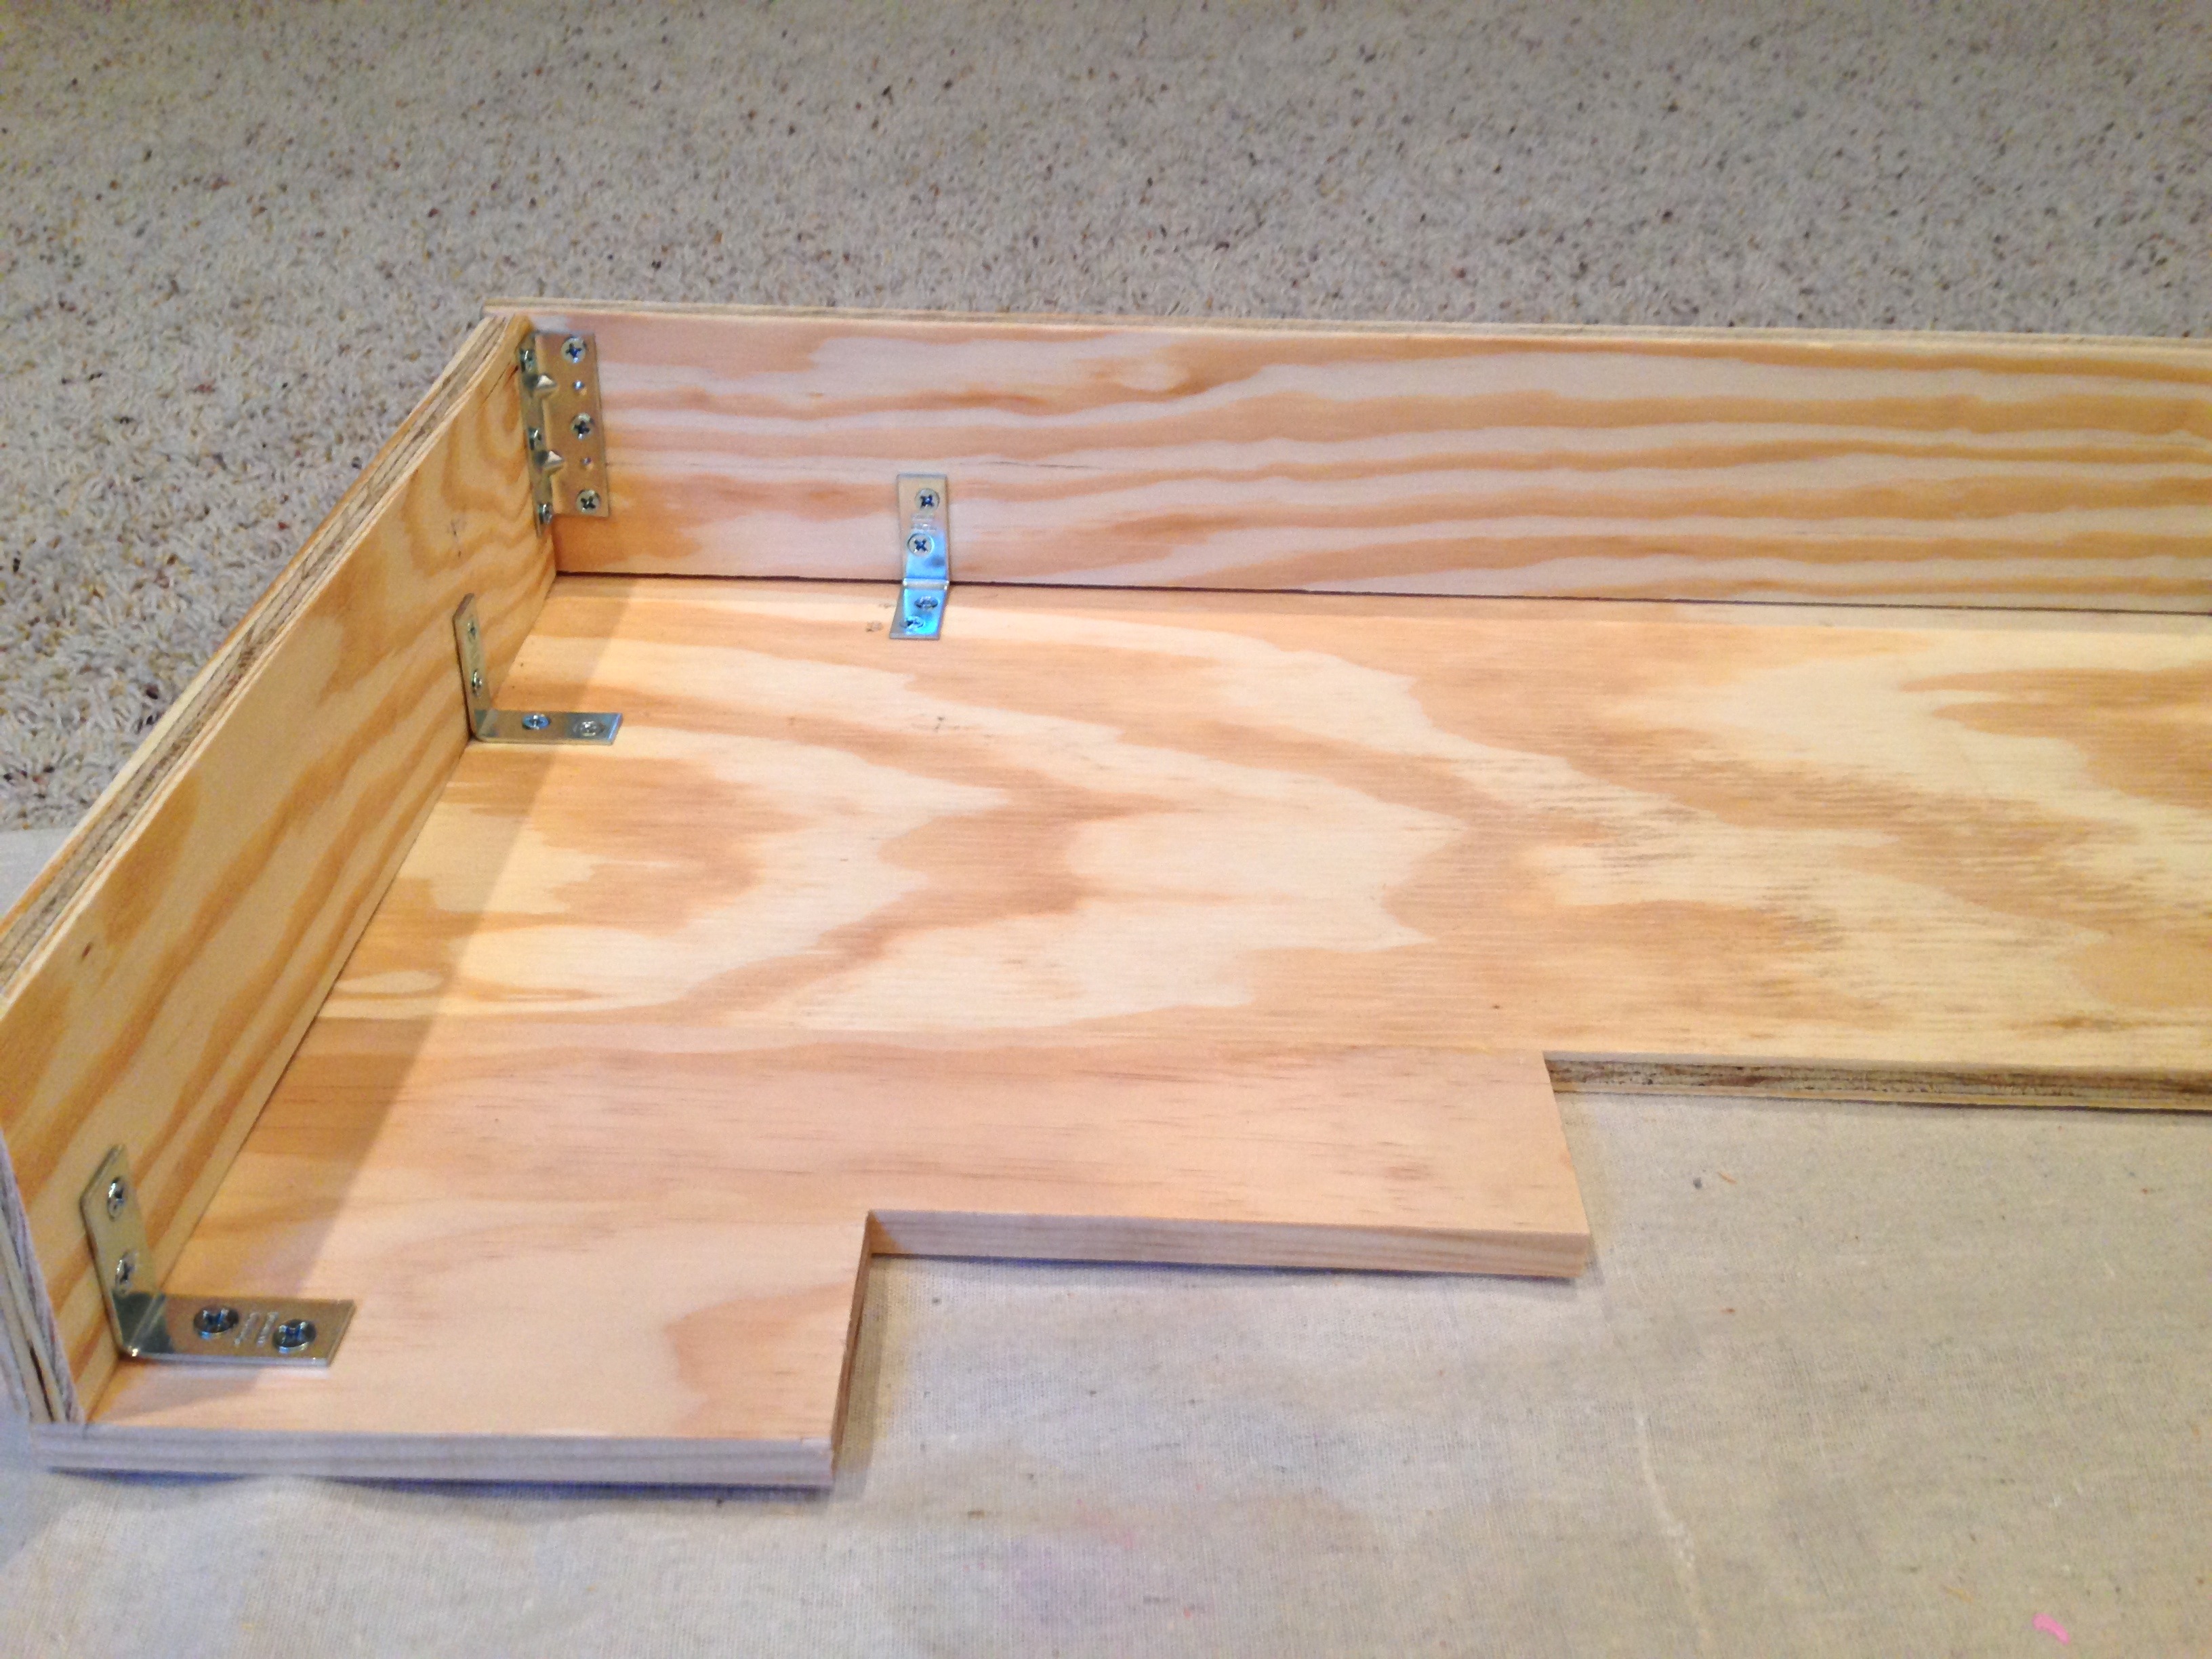
Next I needed to attach my 3.5” strips to the face of the cornice boards to create a box that would sit over our existing faux-wood slat blinds. I used these “L” brackets to attach the back of the face to each side piece. I also used one corner bracket at each corner to give it extra strength.
Here is a picture of the largest cornice board completed (but not covered!) and the smallest one in the glue and clamp stage.

I had to work in phases because I didn’t have enough clamps to do all of the gluing at once. However, I only let the glue dry for about a half-hour so I was still able to assemble both boxes in one afternoon. And you know I like to keep it real! So… I took a break from my project and placed the cornice boards in our den/office with all of my other projects. What a mess!!!

But, as I always say, sometimes you have to make a mess to make any progress!
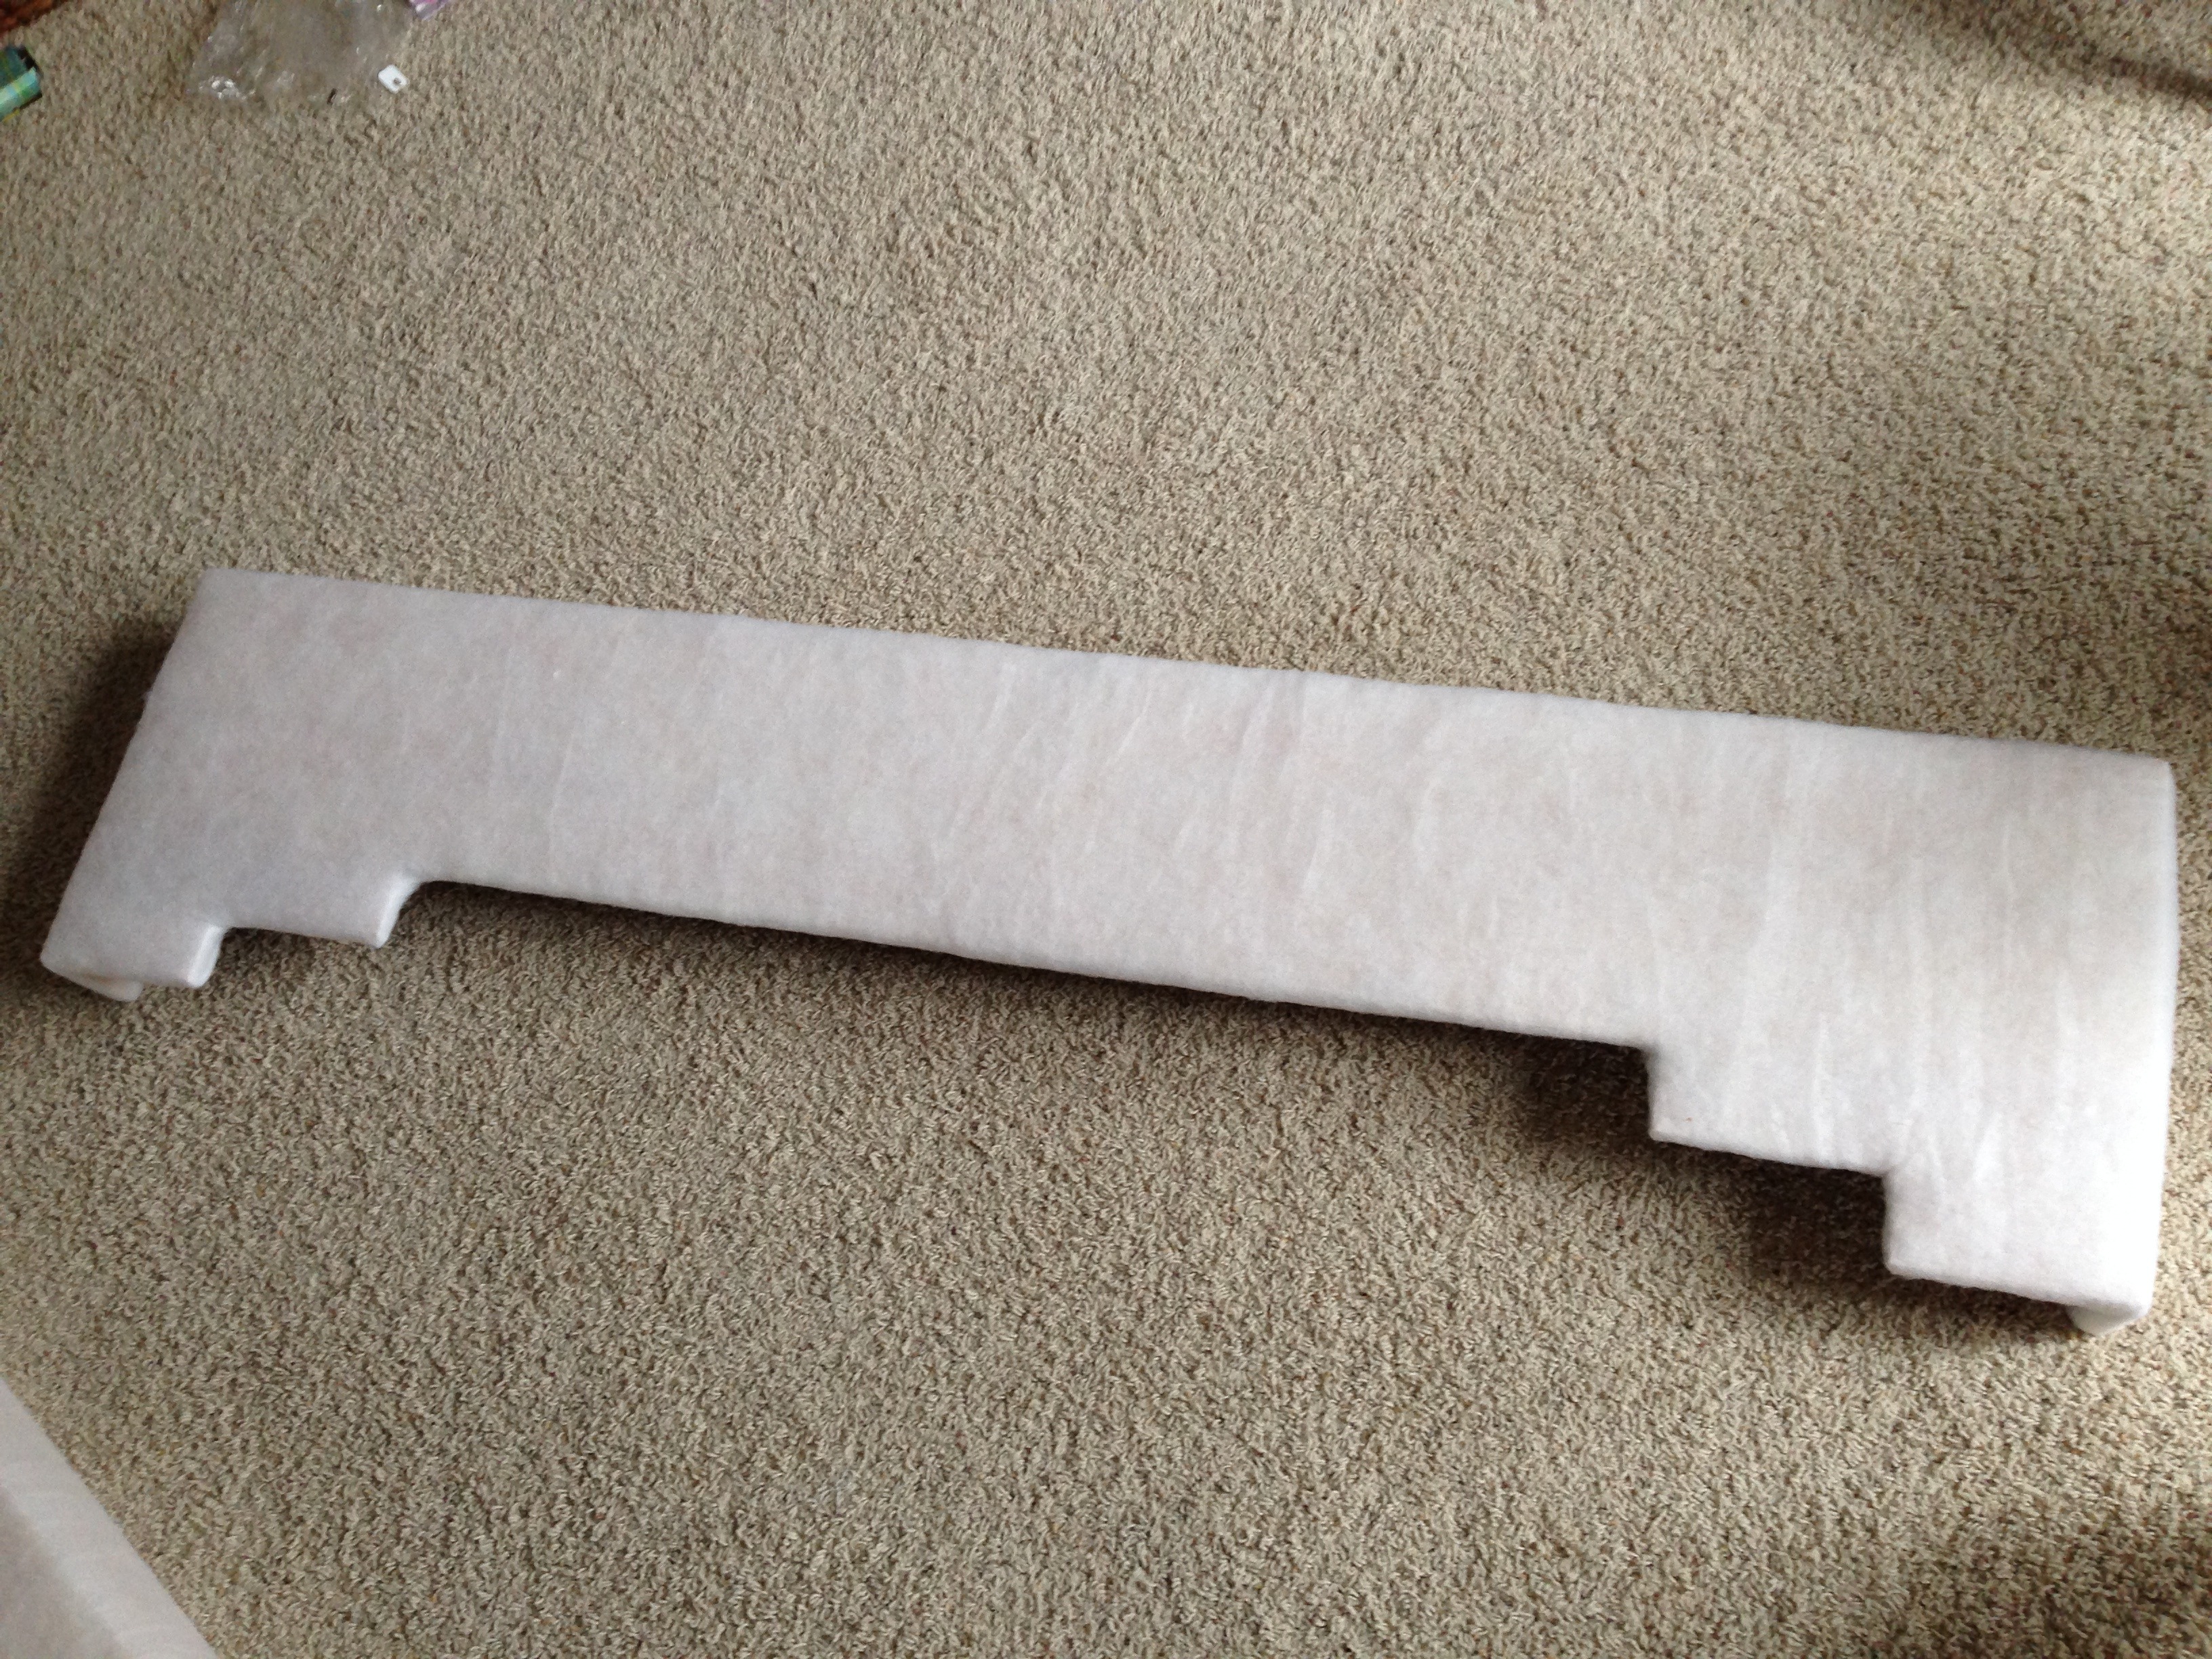
Next I wrapped each cornice board box in batting. I simply used medium weight quilting sheets from JoAnn’s. I bought one queen sized bag, and used a half-off coupon to make it about $12. When doing the batting it is important to pull it tight and staple it into place as you go, but don’t pull so tightly that your wood pokes through on the corners.
Once I had pulled and stapled the batting all of the way around, I trimmed any excess and flipped it over to see the front… It was starting to look like something I might want to hang!
Next I began to measure and cut my fabric. This was extremely tedious! Remember how I said I wanted to order only as much fabric as I would need? Well my calculations were pretty good – but that left me with no room for error! I also decided to turn the fabric sideways to change the pattern slightly. By turning the fabric sideways the pattern was a little thinner and repeated one more time on the face of the cornice board. It just looked better to me… and complicated matters!!!

Even turning the fabric sideways I didn’t have enough length to use one long piece of fabric, I had to piece it together. Had I known I would be turning the fabric sideways I could have order an extra half yard and I wouldn’t have needed to piece the fabric at all. 🙂 Oh well, live and learn!
When you need to piece fabric for a project like this, you don’t want a seam in the middle, it is better to have two small seams on either end. I debated the necessity of this (since one seam would be much easier) but confirmed with my friend Diane that there really was no choice – a middle seam would not look good! This picture proves it’s not the way to go!
Source
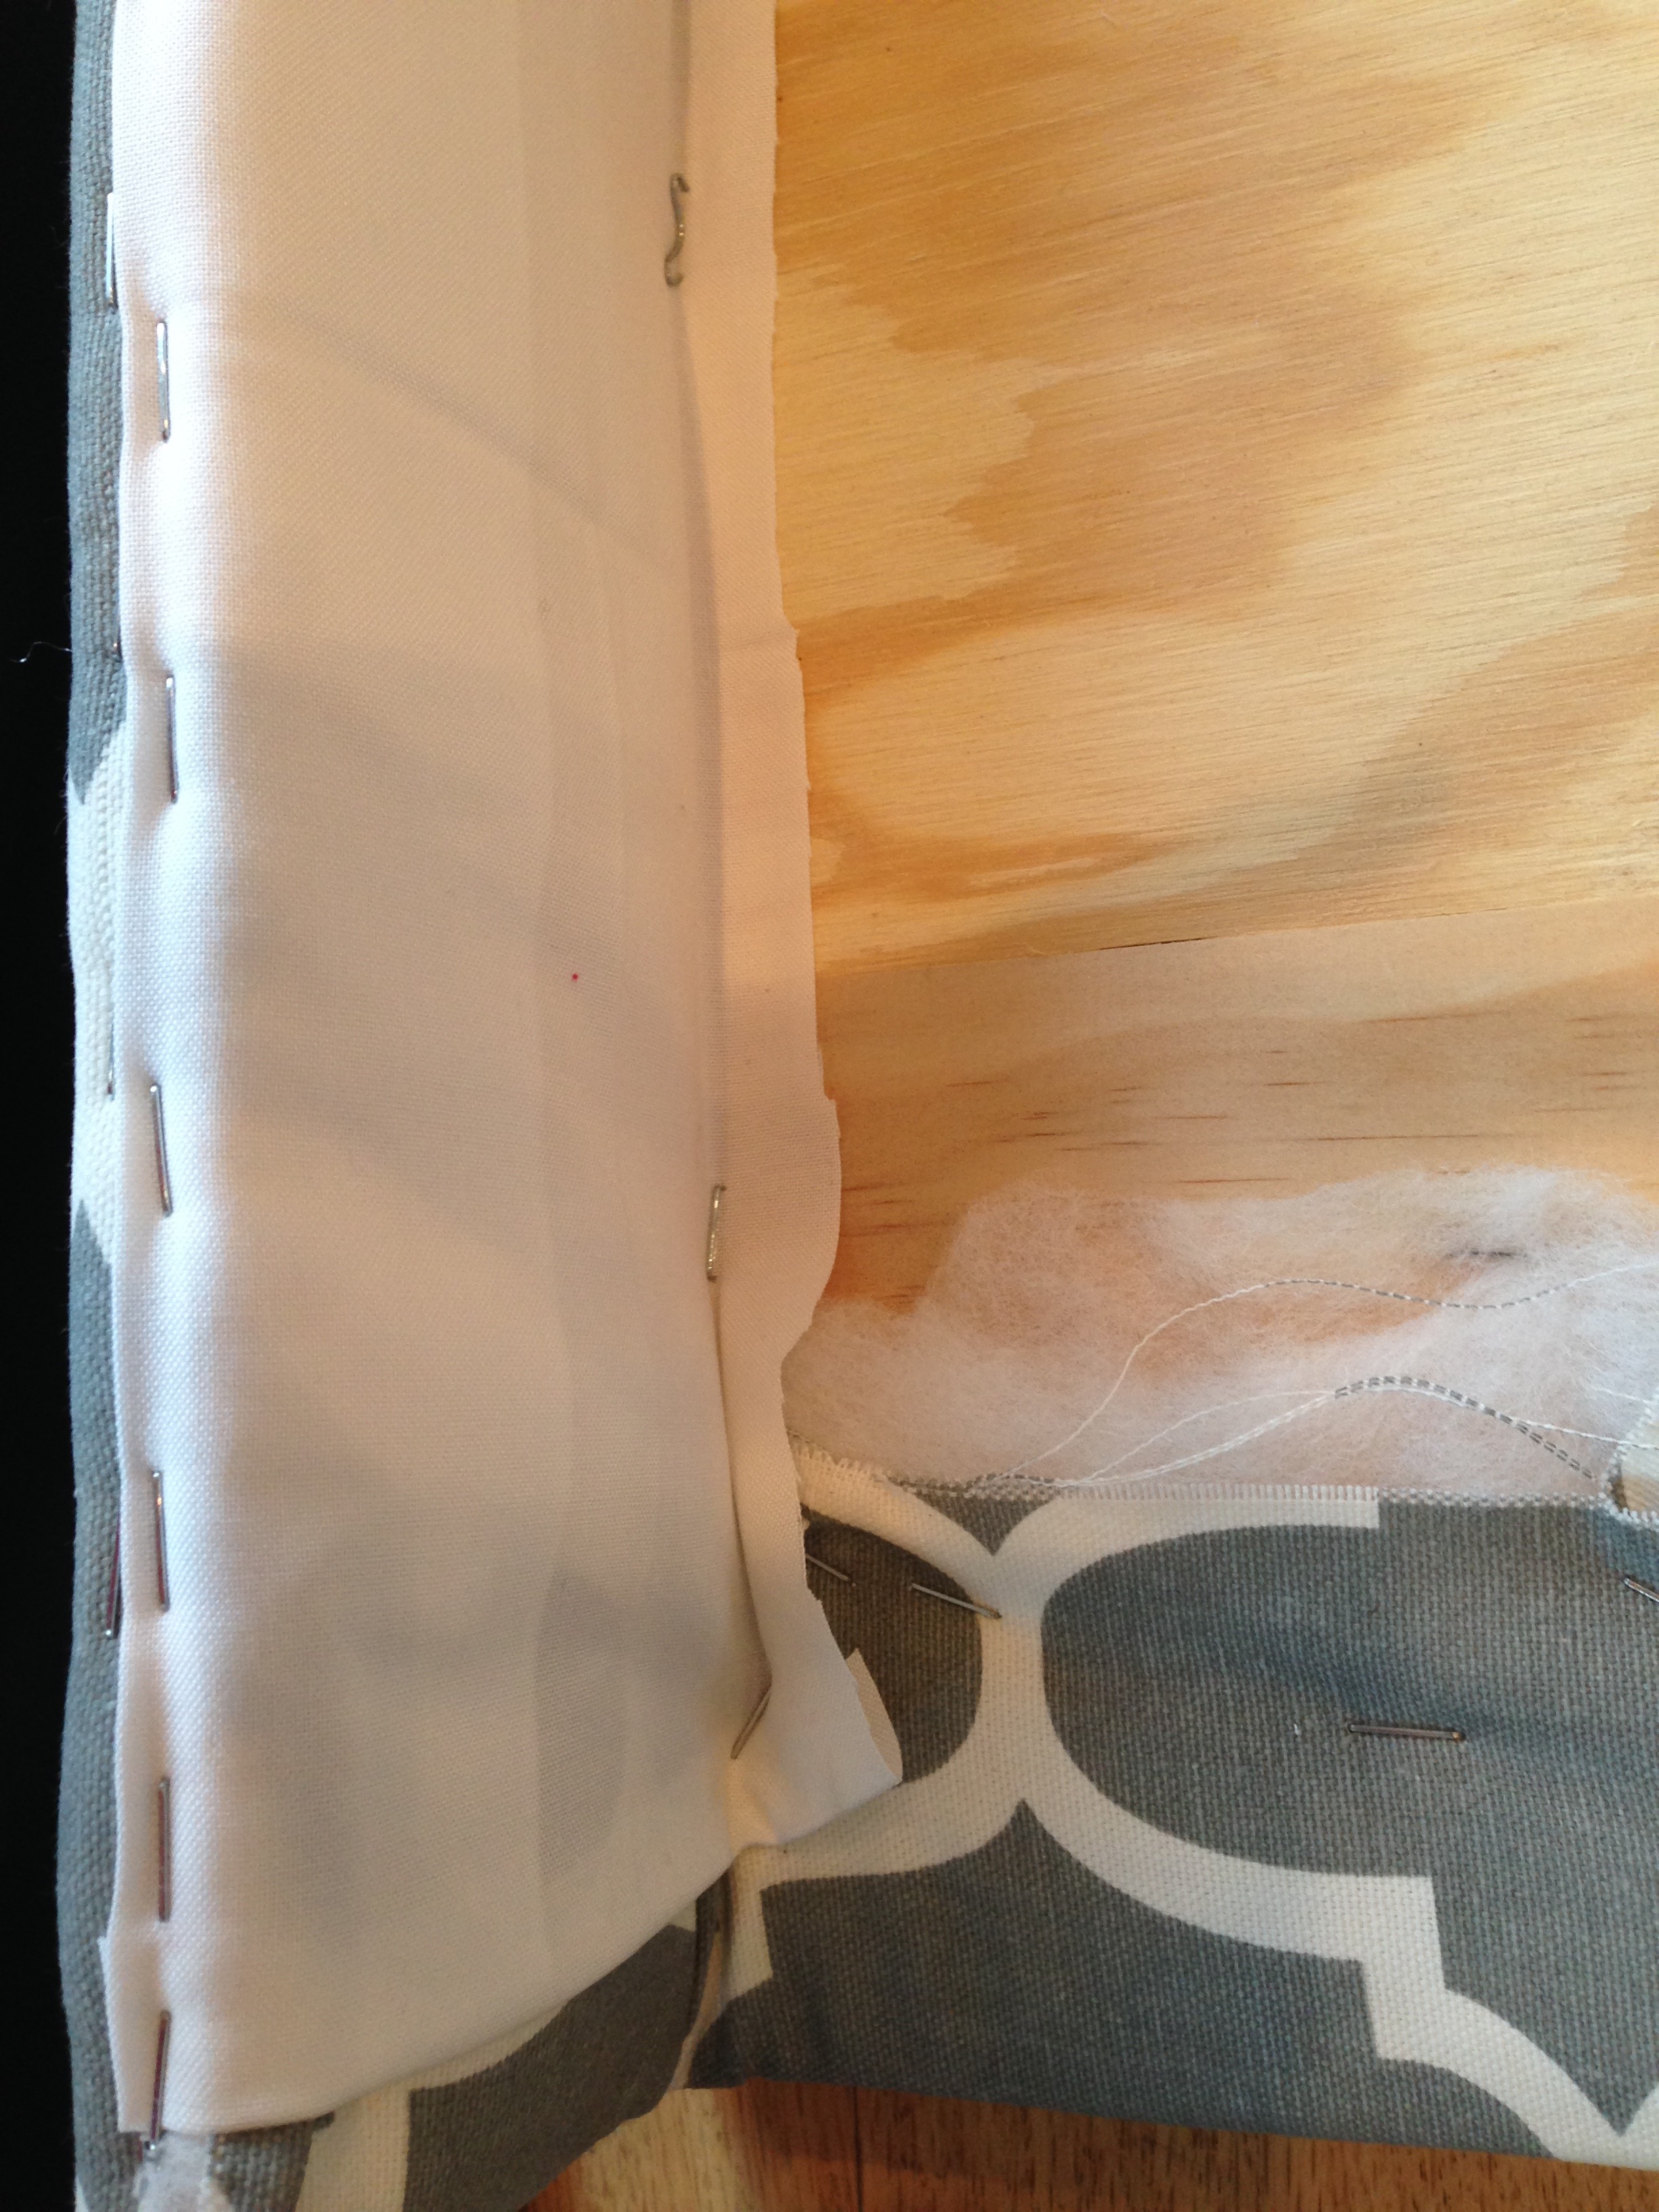
I also had another challenge, my sewing machine is broken. I’m not sure what is wrong with it, but it’s not going to be cheap to just have it sent off to determine the problem. Since I didn’t want to spend the money to fix my machine, or wait to finish my cornice boards I decided to use stitch witchery. I have used it before, and was pretty confident it would work well. I also decided that the inverted corners of my cornice board would be easier to cover if my seams hit right at one of those corners. I’m pretty sure it would have been impossible to line up my fabric pattern and make it the perfect length to have both seems hit an inverted corner. My talents definitely have their limitations!!!
So, I cut my fabric and began covering each box. I found out that covering inverted corners is nearly impossible, especially if you want them to look good! Fortunately I started the fabric part of this project while all of my kids were at school, because one little distraction might have put me over the edge and ended the project! I didn’t end up taking pictures of the process, and can’t really walk you through what I did. Part of the reason for that is about half way through I knew I would not recommend the “really great shape” I had picked to anyone! If I ever made cornice boards again – which I totally would – I would make a simple rectangular box and add trim or something if I wanted more character. I also now know why I couldn’t find one tutorial online of how to cover the type of cornice board shape I wanted – others knew better than to attempt it!
After a very frustrating couple of days I had tucked and pulled fabric enough to be satisfied with the final product. It is far from perfect, but most of the not-so-great things will only be noticed by me and my good friends that I tell about them!

The last step I took was covering the inside of the cornice board with some basic white muslin I had from another project. I wanted to cover the variety of materials I had used to construct and cover the cornice boards so that anyone that happened to see the inside of the cornice board would just see plain white fabric and not a mess of batting, staples, plywood…
The last step was to hang them! I had intended to use “L” brackets to hang them, which is the most standard way of hanging any cornice board. However, once I set them on top of our slat blinds to see if they fit (whew! they did!) I realized that they actually just sat there on their own and didn’t need anything crazy strong to attach them. I also liked the idea of not putting huge holes in our walls and being able to easily take them down and re-hang them if I ever wanted to change out the fabric. (which would be totally insane given my prior experience of covering those darn corners, but I’ve done less intelligent things before!)
So, after consulting with both dads to get their construction knowledge, I decided to simply use a small screw from the top of the cornice board box frame, down into our wood trim. I did pre-drill my holes so I didn’t split our nice wood trim, but it was easy peasy!!!
And after ALL THAT here they are…
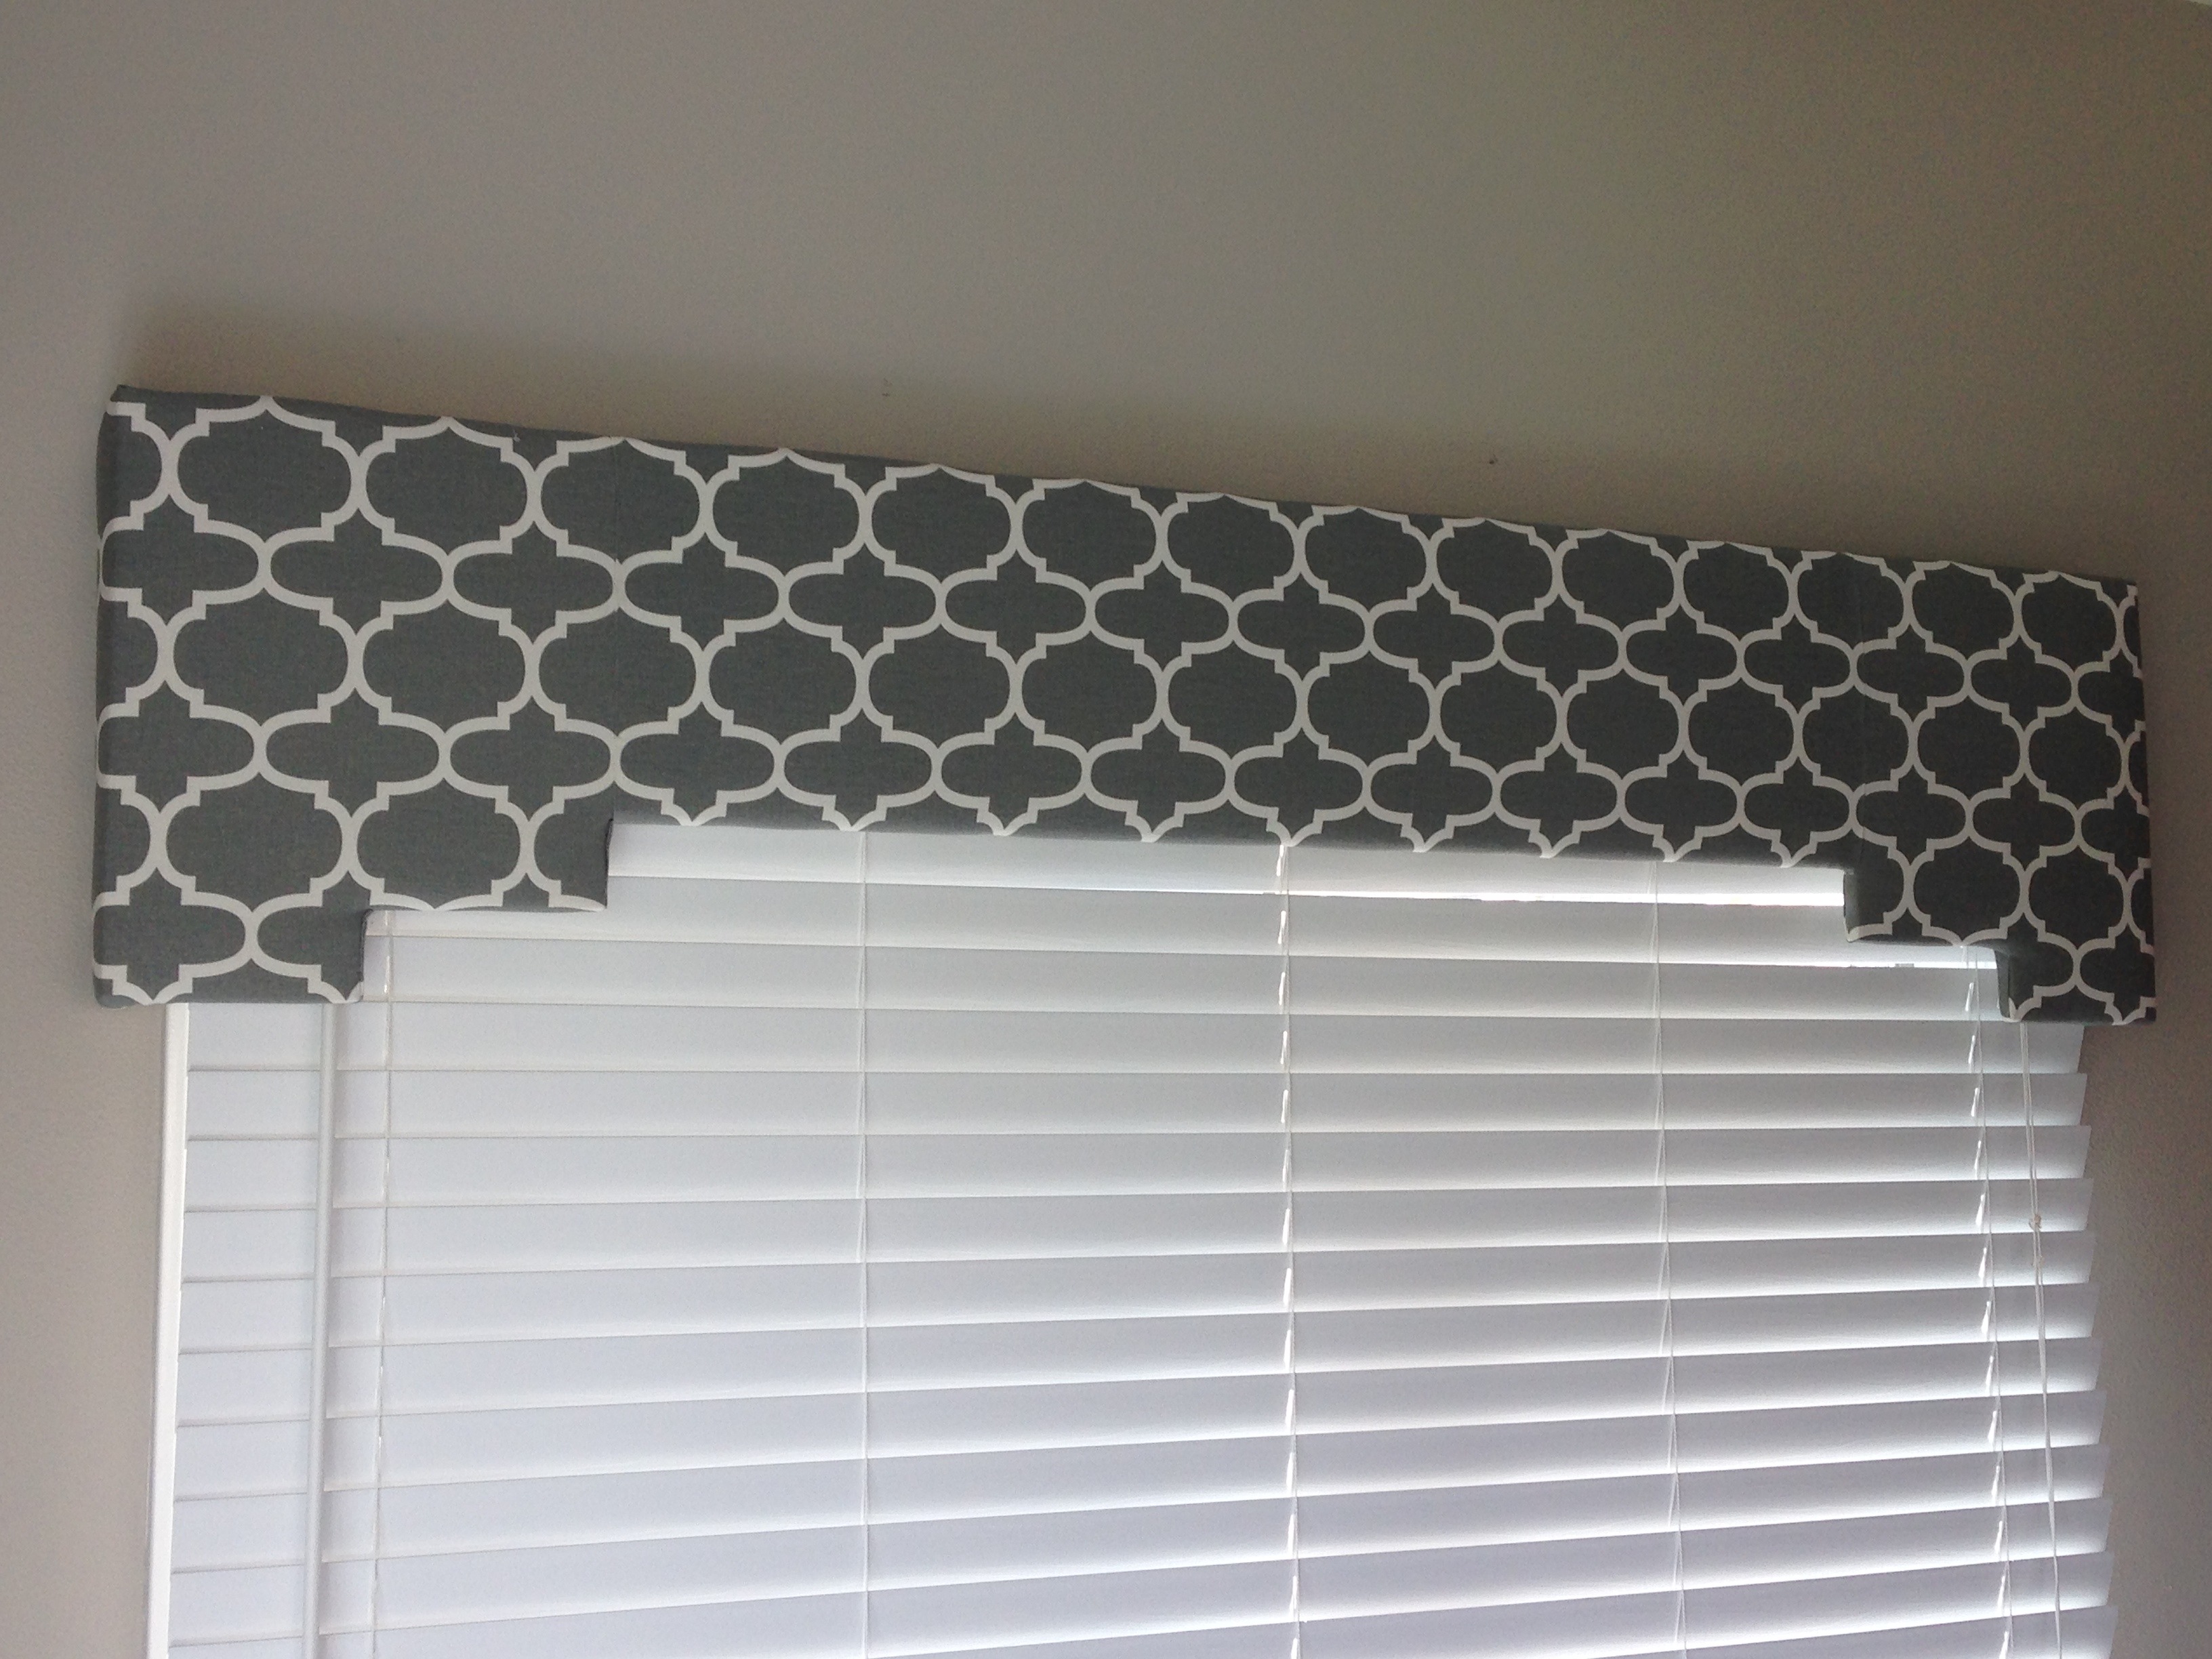
Like? I Do!
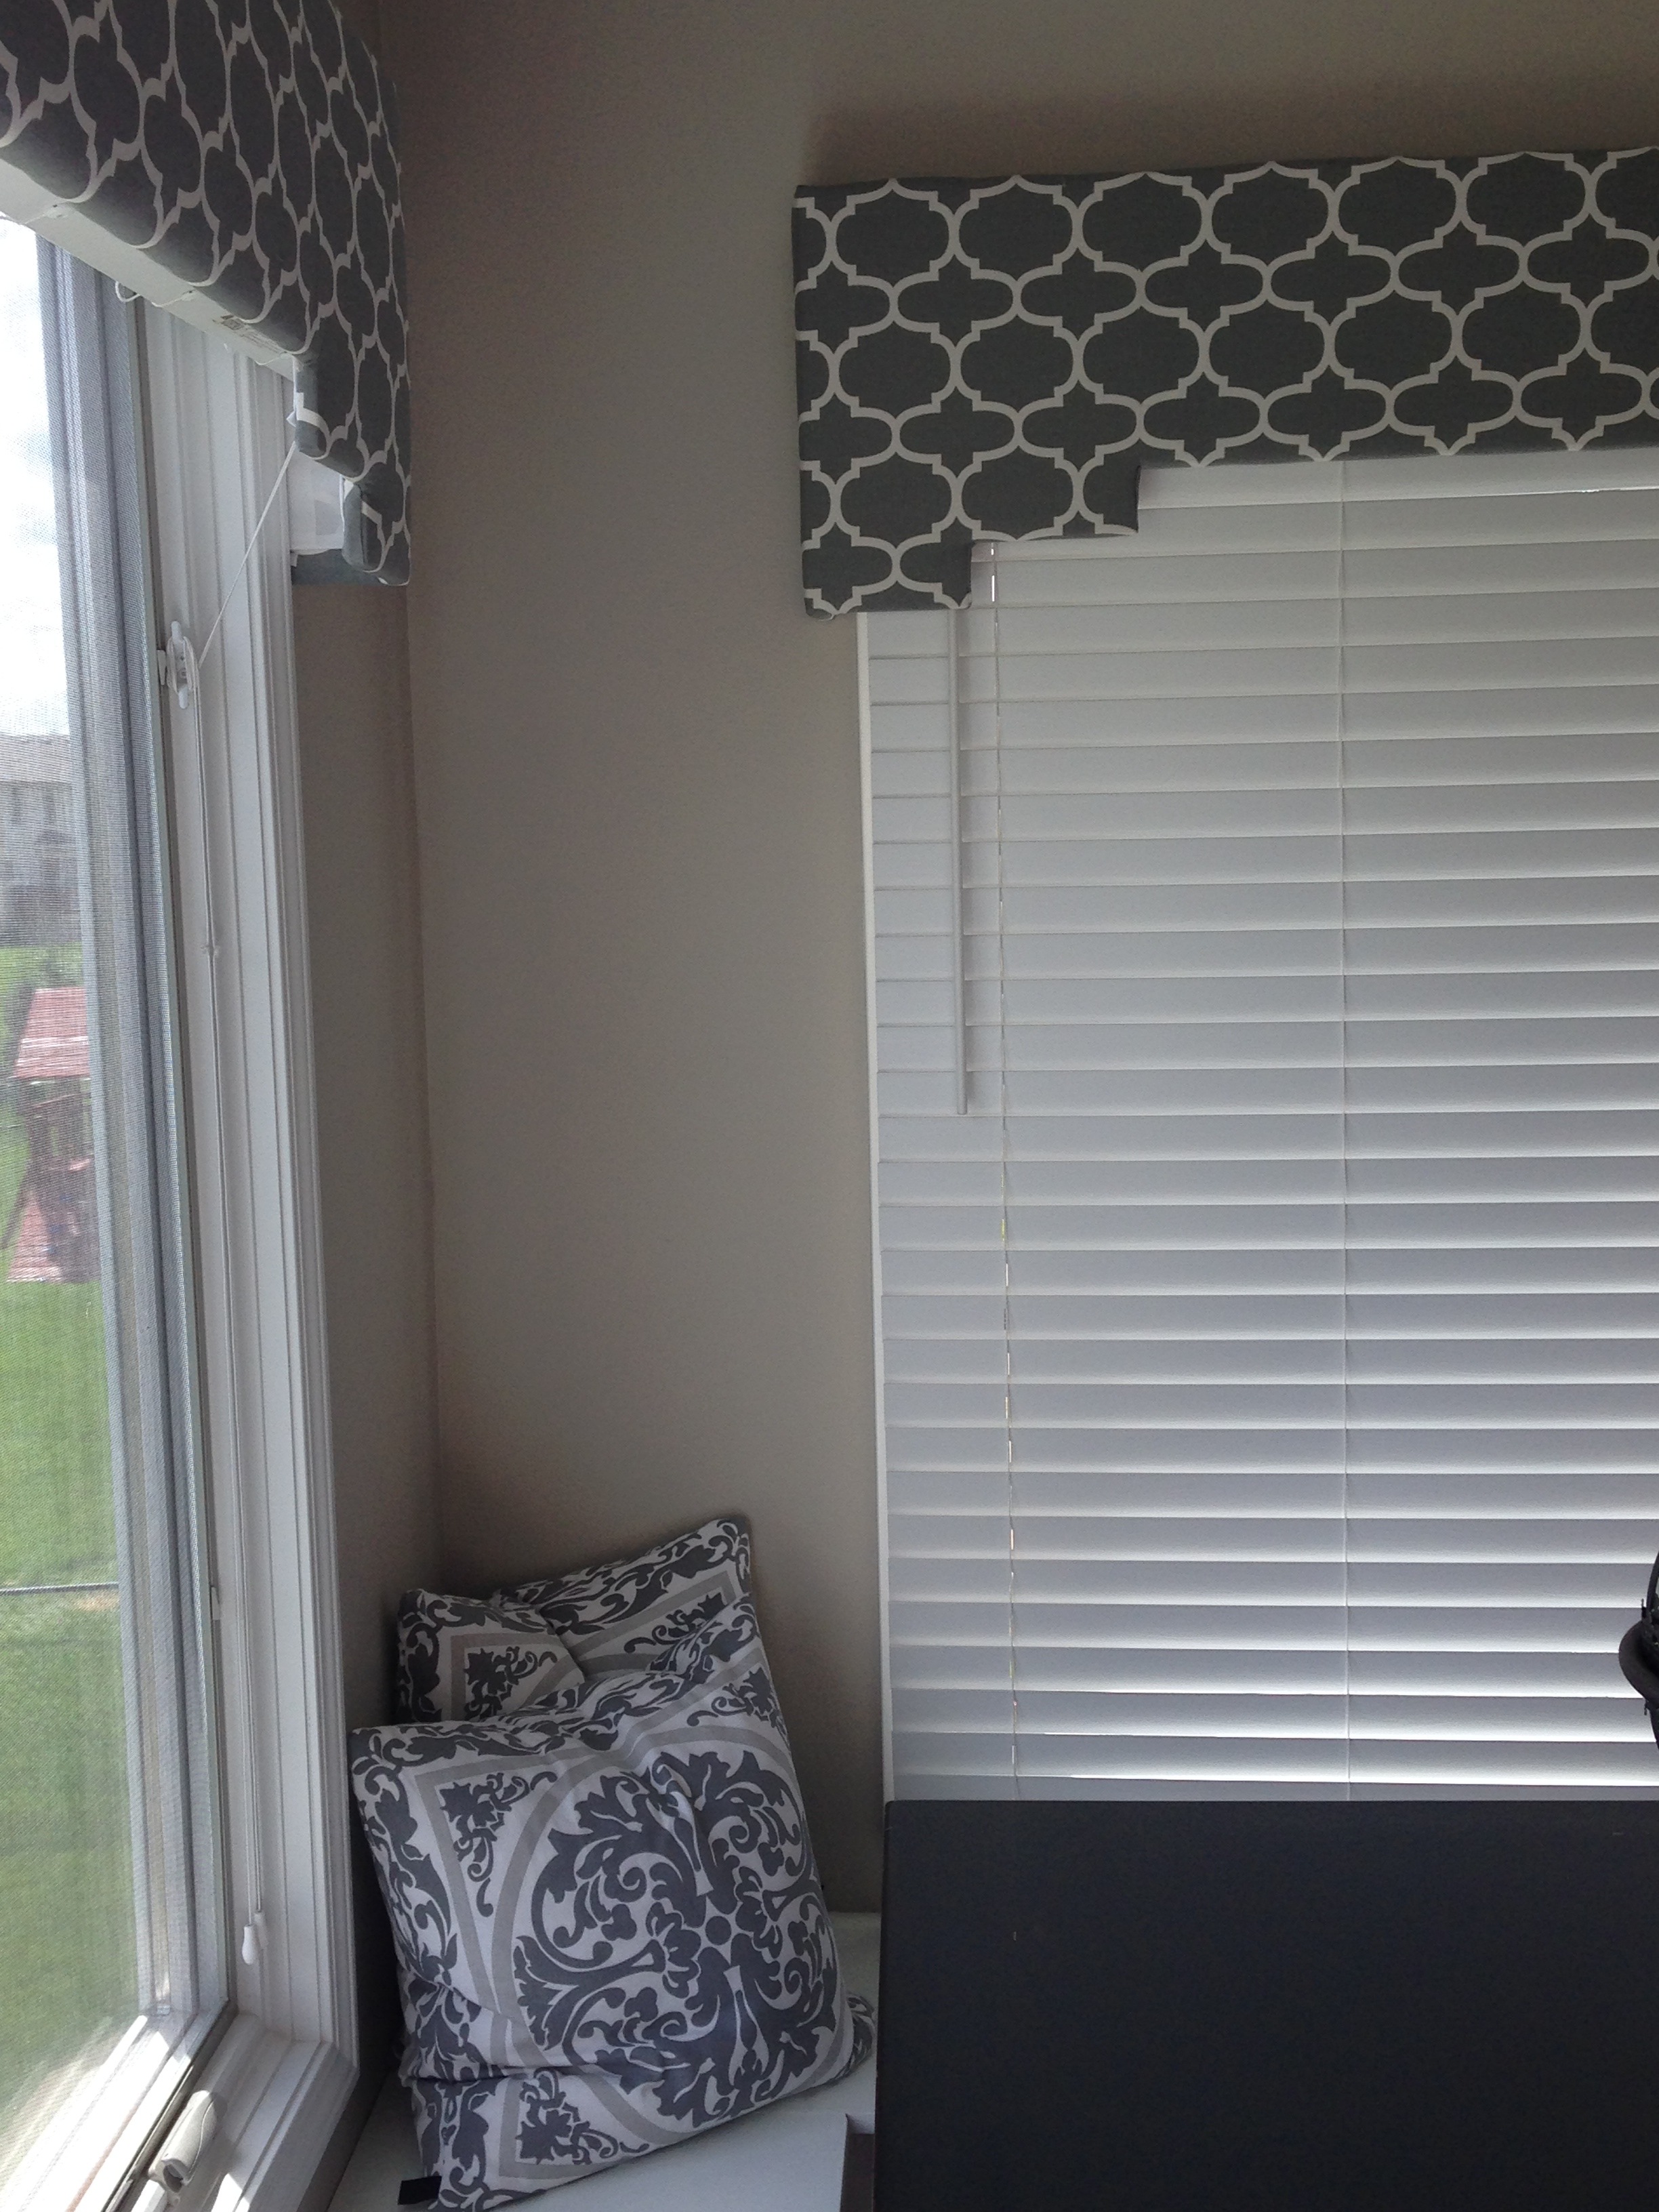
I still look at them every time and see that the fabric isn’t perfectly straight on one side, the inverted corners aren’t perfect, and there is one corner that I didn’t do the muslin as good as I could have… but really, only I notice this stuff! Now all of you will too because I told you, but that’s how I am – I share everything. (I guess that makes me a good candidate for blogging, probably much to my husband’s embarrassment at times!)
I may actually fix the one end where the fabric goes a little crooked. I couldn’t fix it initially because I didn’t have any extra fabric, :/ but now I do… I ordered more fabric to make a matching cornice for our kitchen window. Yes, I’m a gluten for punishment and will be covering those crazy corners one more time… but the kitchen window is in the same line of sight as the dining room so they can’t be different shapes!
It’s worth it though, I really like how they came out and the different style it is bringing to the hub of our home. More to come on the rest of our dining room! The table is ready to move into the house – yeah!!!!!!