
Do you remember that amazing pantry from my first post? I know some of you do, because we’ve talked about it. A few of you have already been inspired to get to work transforming your pantry, which I find super exciting! But, I know that others are too overwhelmed by the whole project to even get started, let alone dream about that crazy nice pantry that inspired me! Others really don’t care if your pantry is pretty, you just want it to function efficiently!
So, I am going to start slow and then go a little overboard! I want to start out with some first steps you can take to make your pantry function better for you. Then, I’ll reveal my budget friendly version of the inspiration pantry in my next post.
I’ve talked before about taking on a big project and making it manageable. I would plan on your pantry being a BIG project – NO Surprise, Right!!! Don’t be overwhelmed by the idea though, it can be a multi-step process. You could set aside a 2-3 hour chunk of time to purge, sort and get a handle on what it will take to finish the project. Set aside another hour or two for rounding up supplies and then 2-3 hours to finish up. If you have an entire day you could do the whole project, but don’t wait for a free day. Really, do those EVER! happen?
Here is a photo of what my pantry looked like last fall, and how it had pretty much looked for years.

Let’s talk about why it functioned well for my family.
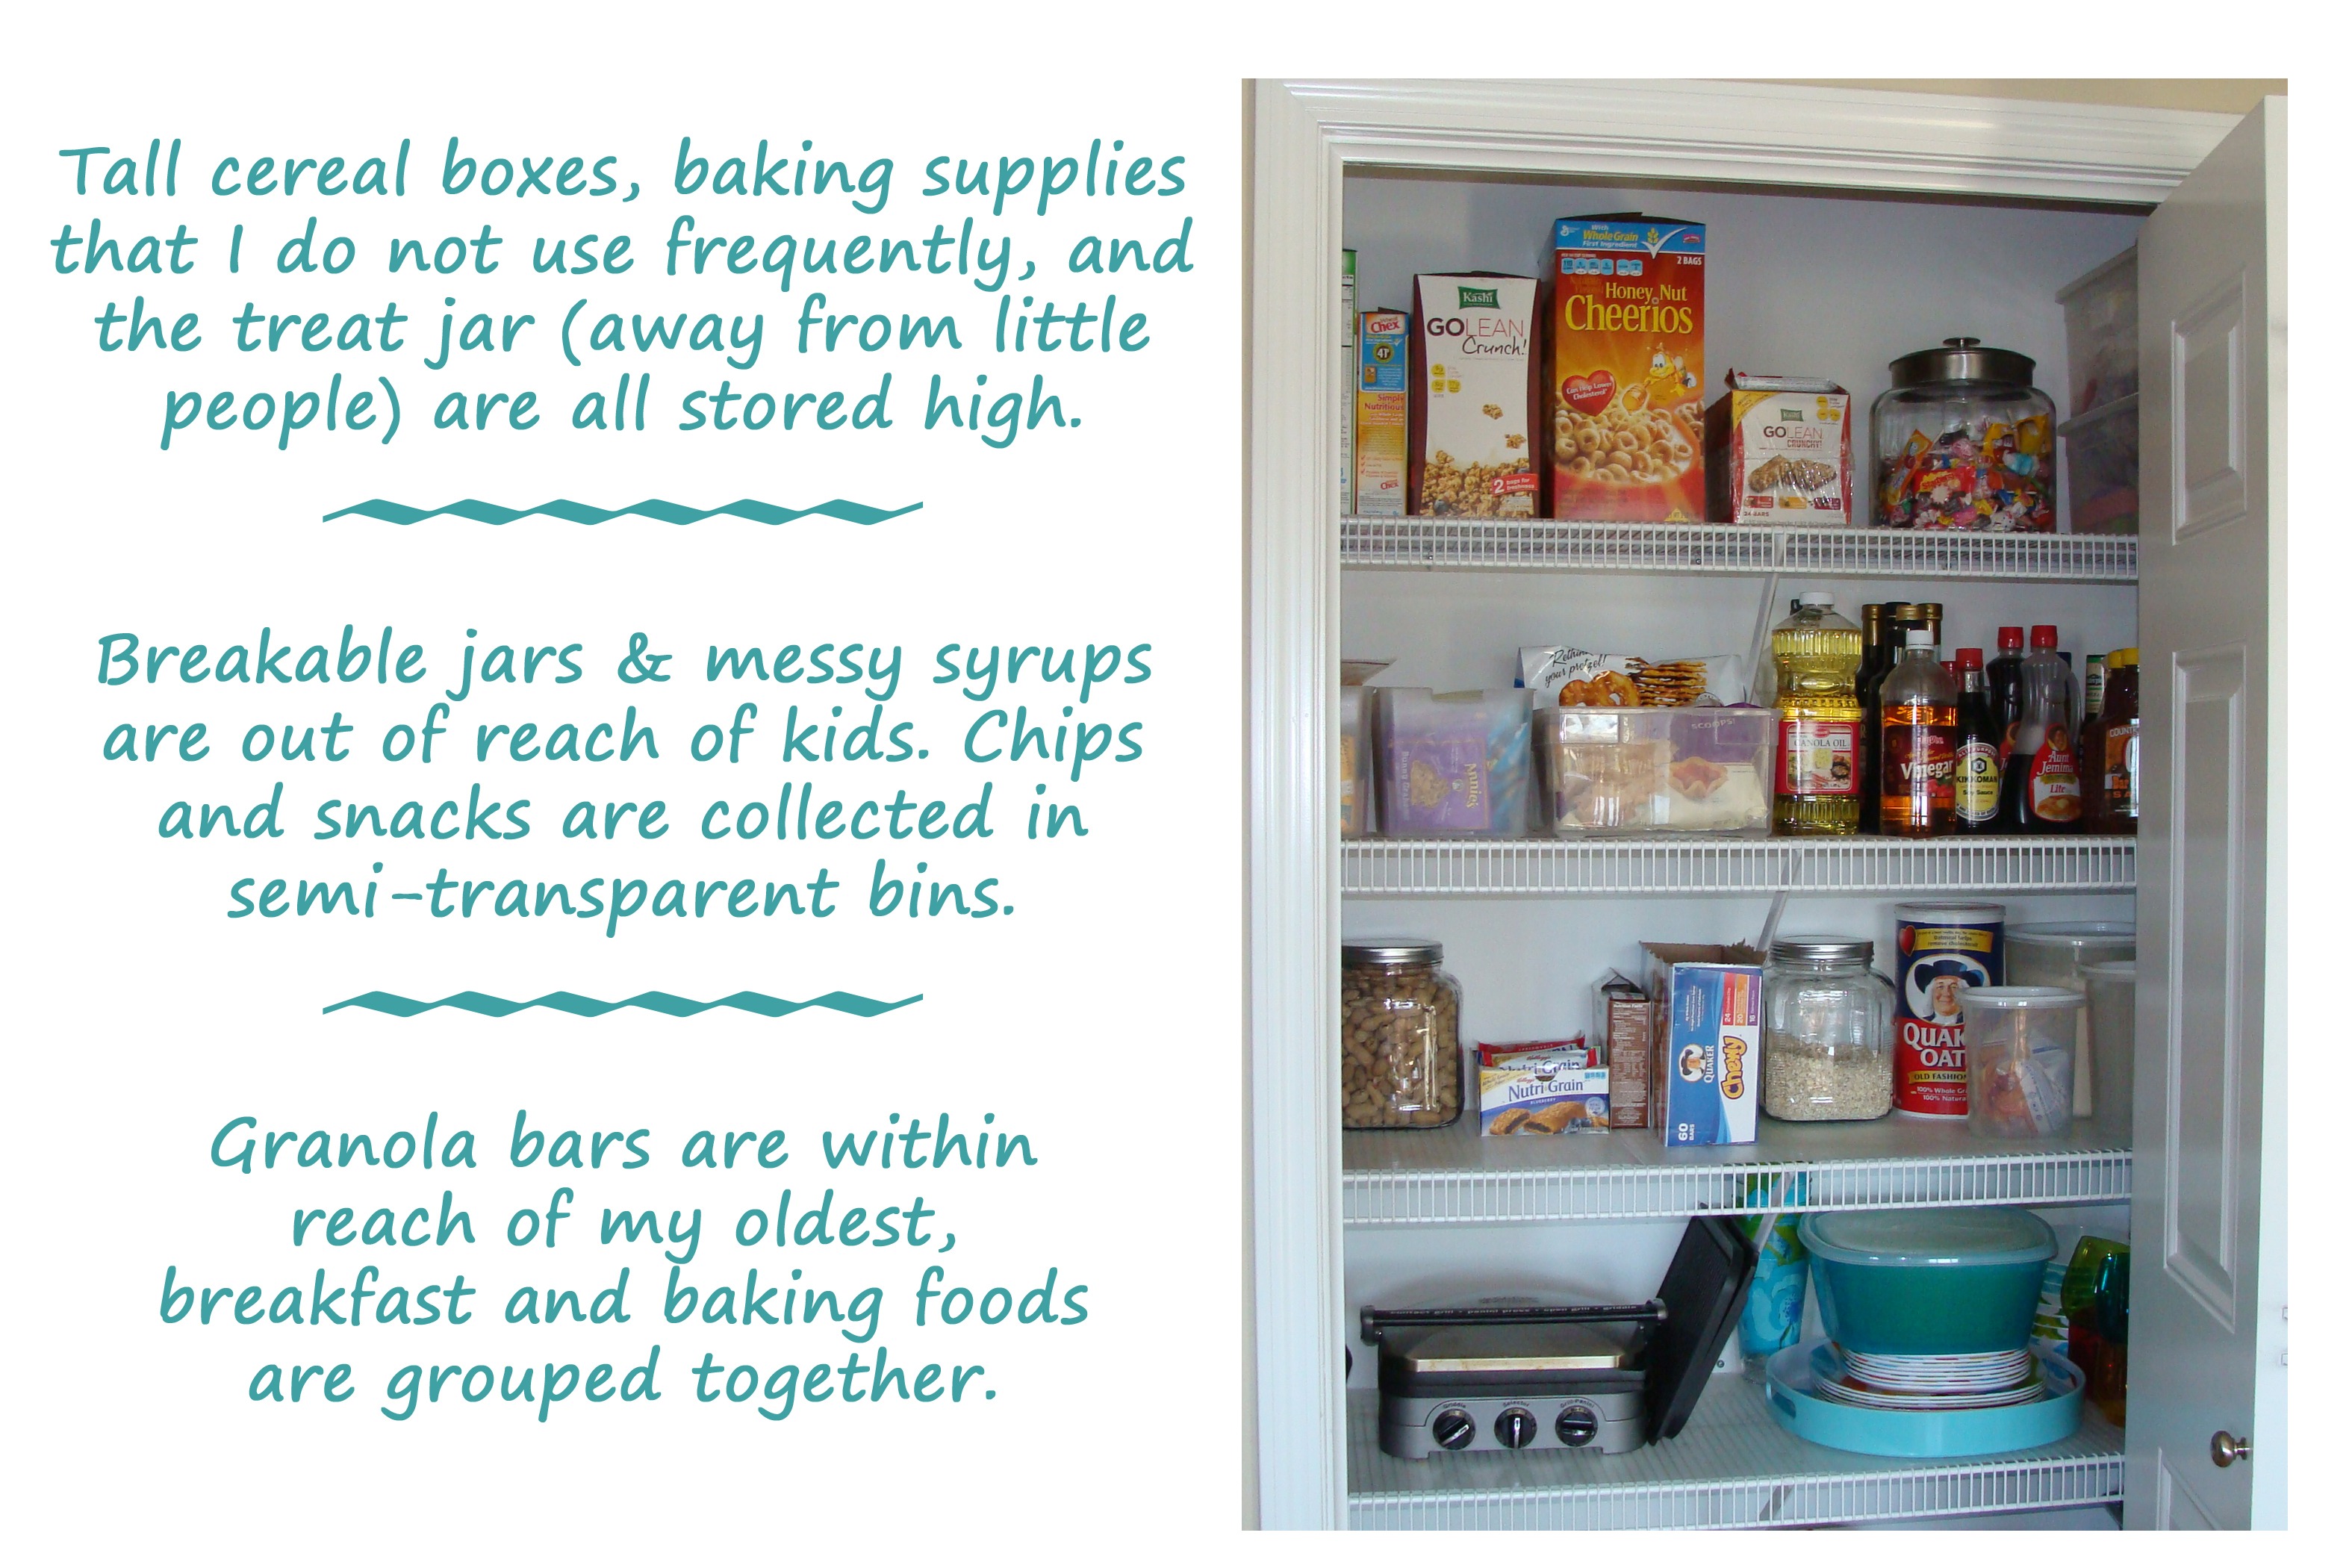
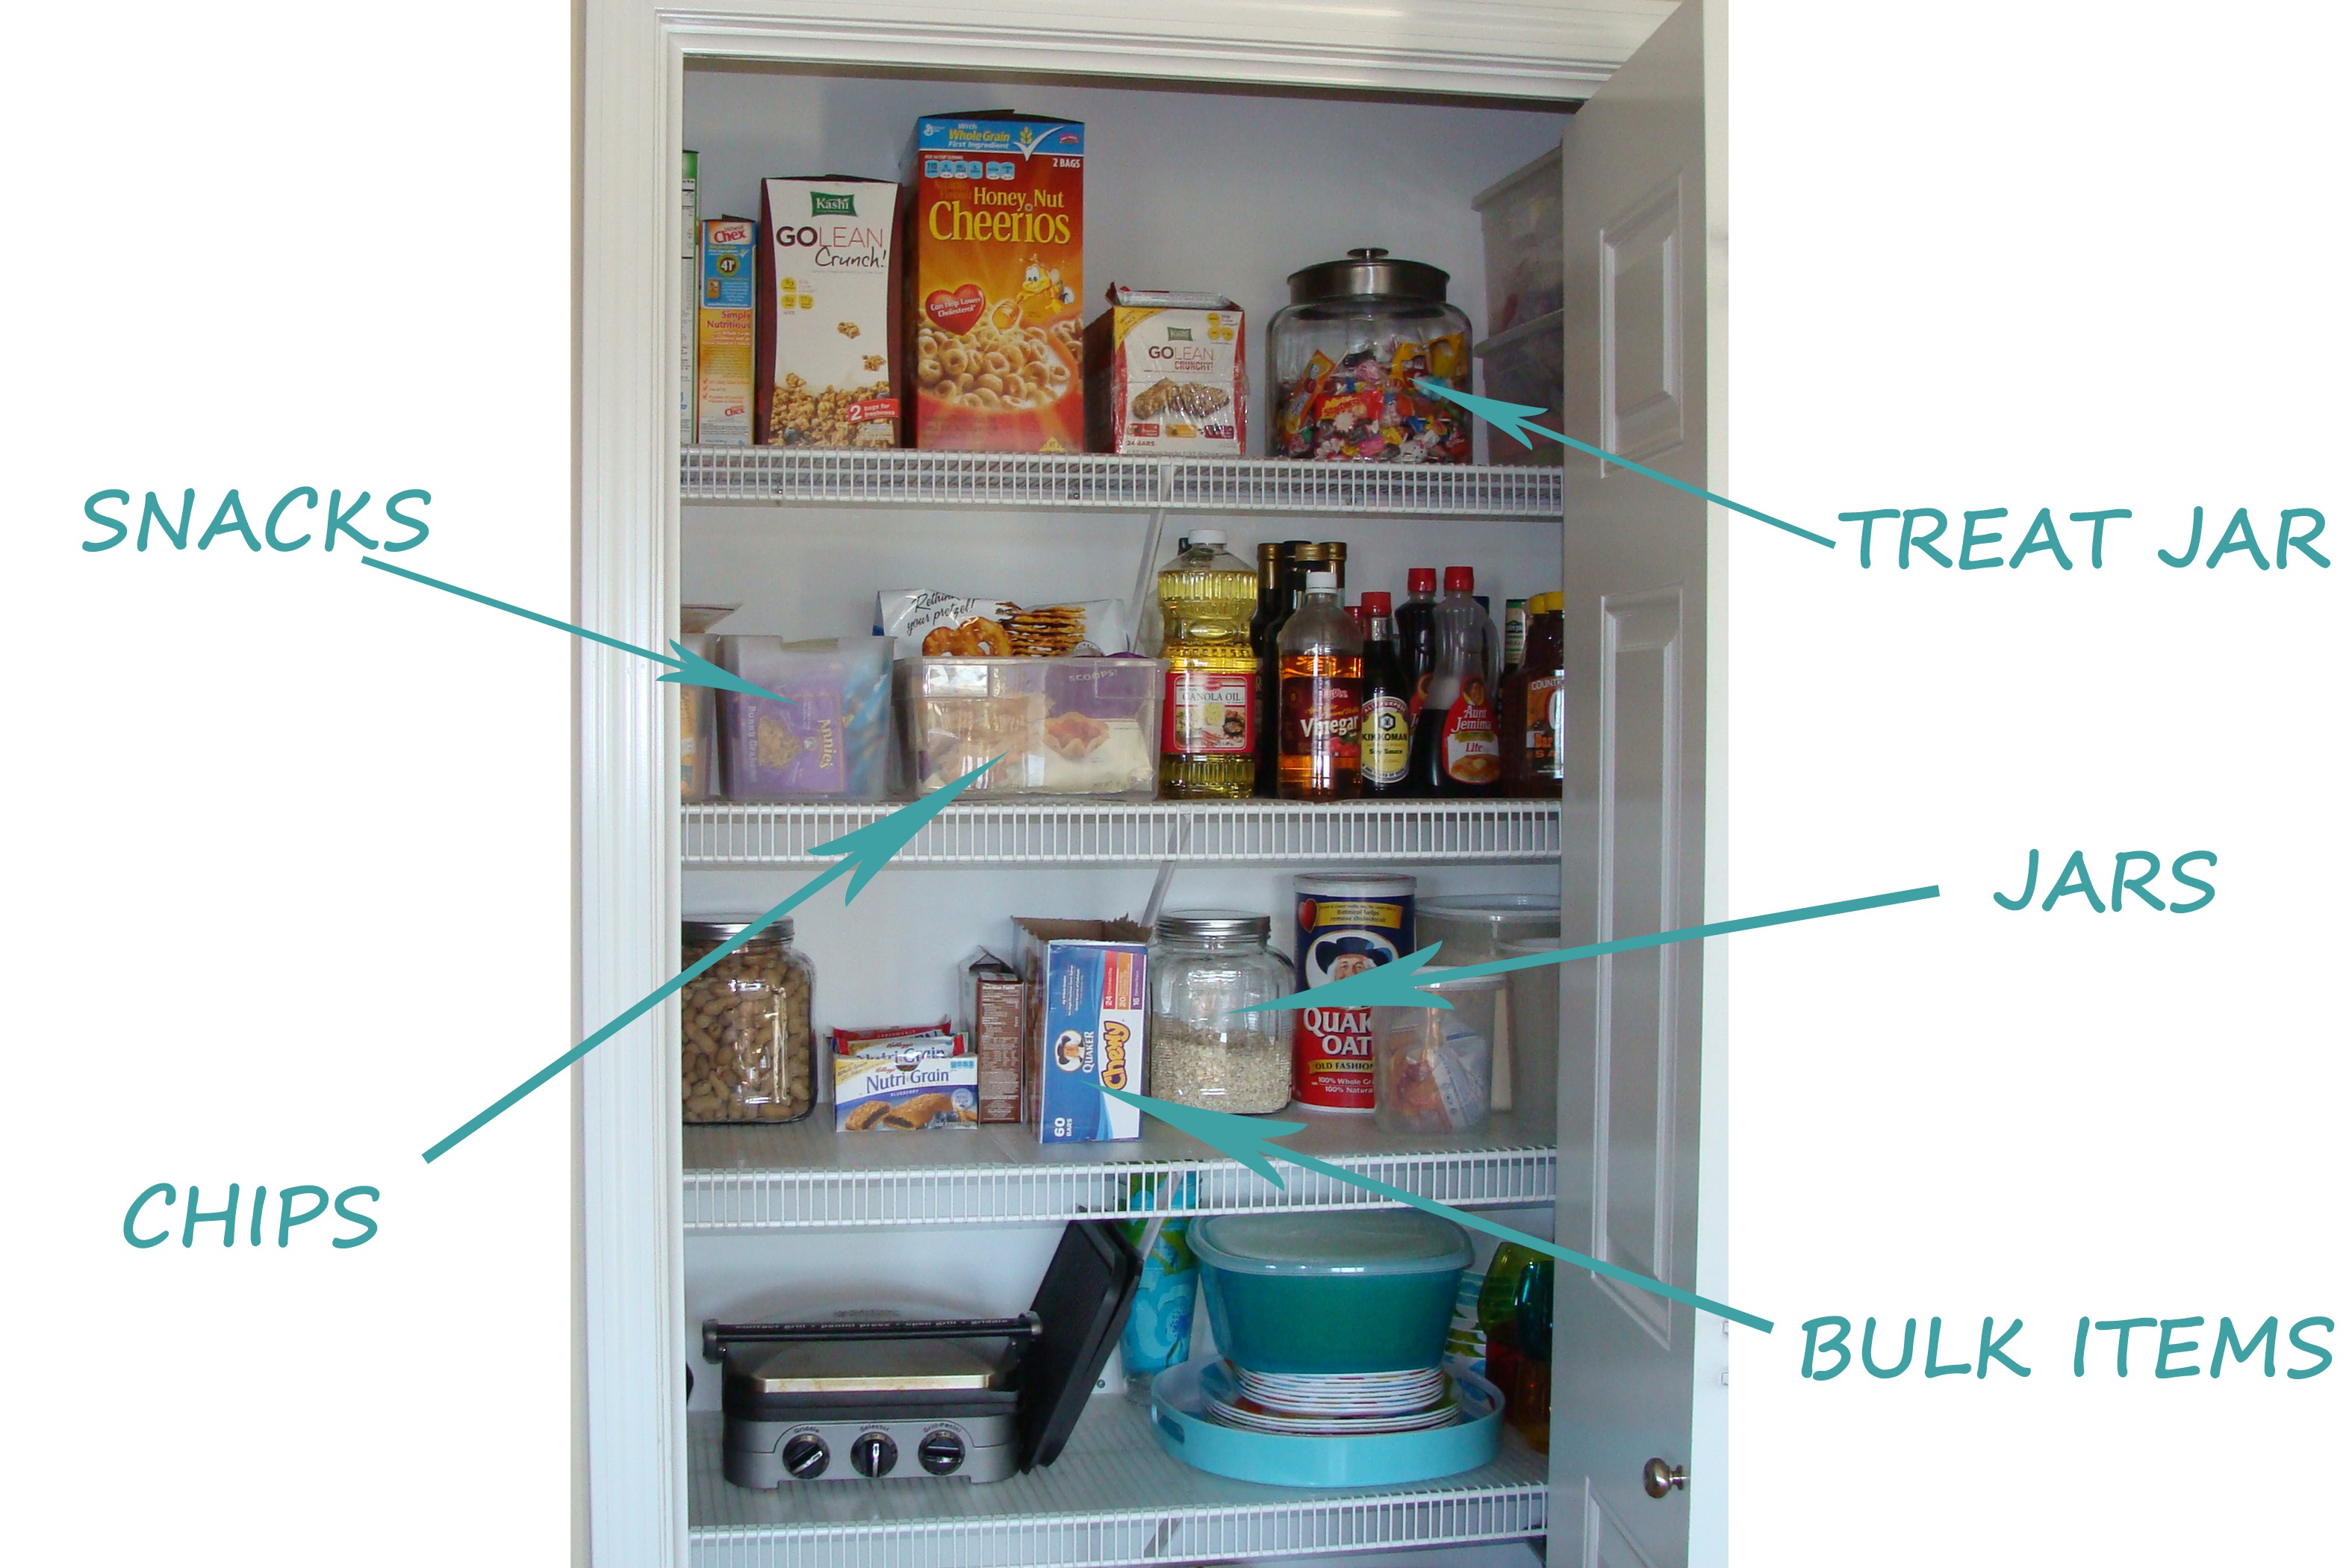
1. I could see everything that was in my pantry. Things weren’t crammed in and piled on top of each other, making it easy for things to “go missing”.
2. When making a grocery list it was easy to check what I had and what I needed.
3. The contents were divided into categories: cereal, snacks, bottles & jars, baking, crackers, breakfast foods, kitchen appliances, tabletop supplies…
4. The floor space was reserved for really heavy or bulky items that really have no other convenient home in a kitchen.
Now, let’s talk about some easy steps to get your pantry ordered and functional. Remember, pretty will be next week!
Step 1: Evaluate Your Kitchen
Evaluate your kitchen as a whole and how it works for you. Do you move about your kitchen easily when unpacking groceries, cooking meals, entertaining guests… When I “fancied” up my pantry I realized I wasn’t using my space well at all. I had groceries in all three corners of my kitchen. When unloading groceries or cooking dinner I would walk around in circles putting things away, gathering ingredients, and putting things back away. Not a great use of space! I realized I needed to move all of my food to my pantry and relocated all of my appliances and tabletop items to different cupboards – that were previously holding food items.
Step 2: Quick Sort
Next, pull everything out of your pantry – yes this will make a huge mess! As you pull things out do a “quick sort”. Place items in the following piles:
-trash
-donate
-relocate to another area of the kitchen
-relocate to another area of the house
-return to the pantry: Go ahead and make piles/groupings according to food type to make the next steps easier. Think about how the grocery store is organized: cereal, chips, snacks, canned goods, pasta, rice, treats, baking items…
Step 3: Clear the Unnecessary Clutter
Clear your work space, and mind! of all the stuff you no longer need for this project.
-Take out the trash
-Place your donation pile in your car (make yourself deliver it within 2-3 days or this will become another project!)
-Distribute the “relocate to another area of the house” pile. BUT!! Don’t get caught up in putting this stuff away if you’re not exactly sure of its home – lay it on the floor in the room it is going to if needed. If you start putting away a million other things you will find a million other projects and get distracted and/or overwhelmed and your pantry will never get done.
Take A Break?
These first 3 steps take a time commitment. This is a good time to take a break if needed. If you are taking a break…
– Put things you want to relocate within your kitchen in their new home if possible.
– Place items that are returning to the pantry back in the pantry sorted by category. Don’t worry about what it looks like. Do take this opportunity to toss any remaining items you realize have expired or you will never use.
– Return the last few things back to the pantry that aren’t going to stay in there, but don’t fit in their “home” yet. (i.e. you need to clear out another food cupboard to relocate the waffle iron)
Step 4: Develop A Plan
1.) Evaluate what you have and how much space each item will need.
Do you have too much of something? If you have more than you’ll need for 2-3 weeks, you might try to scale back your contents. A lot of us have food stores as if we may not be able to make the 3 hour journey by horse and buggy into town again for a month or two. : ) Really though, have your “staples” and “go to foods” on hand all of the time. At most, also have on hand what you plan to use over the next couple of weeks for dinner, (if you meal plan that well, which I don’t!) lunches, snacks and breakfast. If you have a family of 4 or more, most of us only have room in our kitchens for staples, “go-to-foods” and 1-2 weeks of groceries.
2.) Plan your use of space.
– Cereal boxes often work best on the top shelf (boxes are light and tall)
– Look for space around the corner of the door or up high to hang things (grocery bag holder, aprons, bibs, reusable grocery bags…) I love 3M hooks for these things.
– What do you want WITHIN the reach of kids (snacks, napkins…) and OUT of their reach (treat jar)
3.) Gather some boxes, bins, baskets…
– It is helpful to contain some things in boxes, basket or jars. You can use shoe boxes and oatmeal containers if you want it to be free. You can buy $1 shoe boxes and $1 baskets at your local dollar store if you want to do it on the cheap.
– A medium sized basket or box for chips
– 1-3 snack boxes for your kids that you can empty the individually wrapped items from their carton (these cartons take up way too much space – especially when they only have 1-2 items left) By using a small bin you can contain leftovers of one box and a new box all in one (an exception to this: you can often use large “Costco” bulk packaging as your larger container.)
– Stack cans together in one of the more “hidden” spots (it is hard to make cans look all that nice!)
– Line up boxes of pasta, baking mixes, crackers….. within their category
Step 5: Gather your Supplies
Step 6: Give Everything A Home
If you are returning to your project after taking a break, I find it is easiest to start by pulling things back out of the pantry one category at a time.
– Re-sort what you intend to keep, and make sure nothing is expired.
– Toss items you bought for a “specialty” dish and won’t use in the next 6 months (You may be wasting that ingredient, but organizing your pantry will save you even more money by knowing and using what you have.)
– Line items up largest to smallest. This looks nicer, and makes things easier to locate. Notice I don’t do this with cereal, because only my husband really eats cereal so I keep his every day stash easy to access. The rest of the cereal is for baking and snack mix recipes.
– Put your boxes, bins and jars to work! Get rid of as many bulky packages as you can.
– Line things up like they do at the grocery store. imagine your pantry as one of those neatly lined up, categorized and well stocked shelves that makes everything look appealing even though there is a ridiculous amount of product in front of you.
Another look at my pantry, as of last fall…
Notice that even though it functioned really well, it was FAR from Pinterest or “cover photo” quality. I love this pantry because it took little time to establish or maintain but still functioned well for me, my family and guests. I didn’t waste time or money looking for lost items, or buying duplicates and everyone could easily locate what they needed. If you are frustrated by your pantry, I encourage you to shake that “fancy” image of my first post and just create an efficient food storage space for you and your family!