I’ve admitted it before, but I despise laundry! It is the one household chore that I find no joy in either the process of doing it or the accomplishment of completing it – probably because it seems like it is never actually complete. So, my laundry room being in order and peaceful on laundry day is a must for me. This is especially challenging because our laundry room is also our mudroom.
Before I sound like I am complaining too much! I must admit that our laundry room and mudroom being one in the same is often a really good thing. On hot summer pool days, muddy days and snow days… I can bring all the dirt in the door and drop it, never tracking the wet and mess through the house. The challenge simply comes when the mud, snow and water have been coming through my mudroom and I want to wash and fold linens and clothes in my laundry room.
I also find my laundry/mudroom has become a drop zone for every miscellaneous category of stuff in our house. It is located directly inside the door to our garage – our main enter & exit zone, and right off the kitchen. It is also the only well-sized storage area in the lower level of our home. So, I literally have laundry detergent, laundry supplies, rags, lightbulbs, batteries, tools, sports equipment, beach towels, patio decor & pillows, hats & gloves, dining room linens, cleaning supplies, our family command center and our lockers for coats, shoes and back-packs all crammed in what is actually one of the smallest rooms in our house. As you can imagine, a lack of order would easily result in mass chaos.
So, over the next few weeks I’ll be sharing a few different aspects of our laundry/mudroom that help us keep it all in order. I will also be sharing some of the “projects” I have in mind that would make it an even happier space for all that work!
I’ll start with the main “laundry” zone of the room. I think zones are really helpful – especially if a room has a wide range of fairly unrelated purposes. Our laundry room has one wall with our utility sink, (which I LOVE having!) washing machine & dryer. I have organized the room so that the cabinetry on this wall holds the cleaning and laundry supplies, while the other wall with our lockers is designated for the items that usually come & go with us in & out of the house.
Here is the storage area I’ll focus on in this post. Yes, that is a really bright orange paint color! Our house has a very muted and neutral color palette, so I decided to have a little fun in this room! I want this area to be ordered for all of the obvious reasons: laundry goes faster if I know where everything is, I know where things are located and don’t buy duplicates, it is easy for me to know what I am running low on when I go to the store…. But for me, orderly storage also helps me focus on my task of washing clothes.
I know many of you are like me 😉 and as we move around our house to accomplish chores we get sidetracked by all of the additional projects we’d love to tackle. If I saw a messy cupboard every time I reached for laundry detergent, I would get frustrated by the clutter that I don’t have time to deal with because of the never-ending task of doing laundry. This could make me even grumpier on laundry day!
The left side of my cupboard holds most of my laundry supplies. As you can see my detergents and stain spray just sit on the bottom shelf – the easiest place for me to reach them. The small blue box is other random laundry supplies: clothespins, lint roller, lint shaver, Rit dye, mesh bags for washing delicates and a few other small items. As always, I like creating a boundary for these items and having a practical way of keeping them together and concealed.
It is easy to hold on to way too many samples and nifty gadgets that we never use. Having this box helps me edit what I keep to the things I will actually use. This also maximizes my space, gathering up a lot of individual small items. The label helps others know what is in the bin, and encourages me to keep it sorted instead of using it as a dumping spot for all the random things that make their way into the laundry room.
The top two canvas bins are light bulbs that we replace most frequently, and my cleaning rags. Again these two bins provide me with a boundary, and contain two items that could easily become a towering mess on the shelves. Do you save every old towel, t-shirt and sock as a cleaning rag? I have never reached the bottom of this canvas bin and wished I had more cleaning rags. I know it can feel wasteful to throw away a perfectly good cleaning rag, but it you have too many you are not being thrifty in a good way. Too much stuff, simply removes value from what we do have. Keep a reasonable amount of things (rags, light bulbs, etc.) on hand in a way that you can easily access and store them. Get rid of the rest!
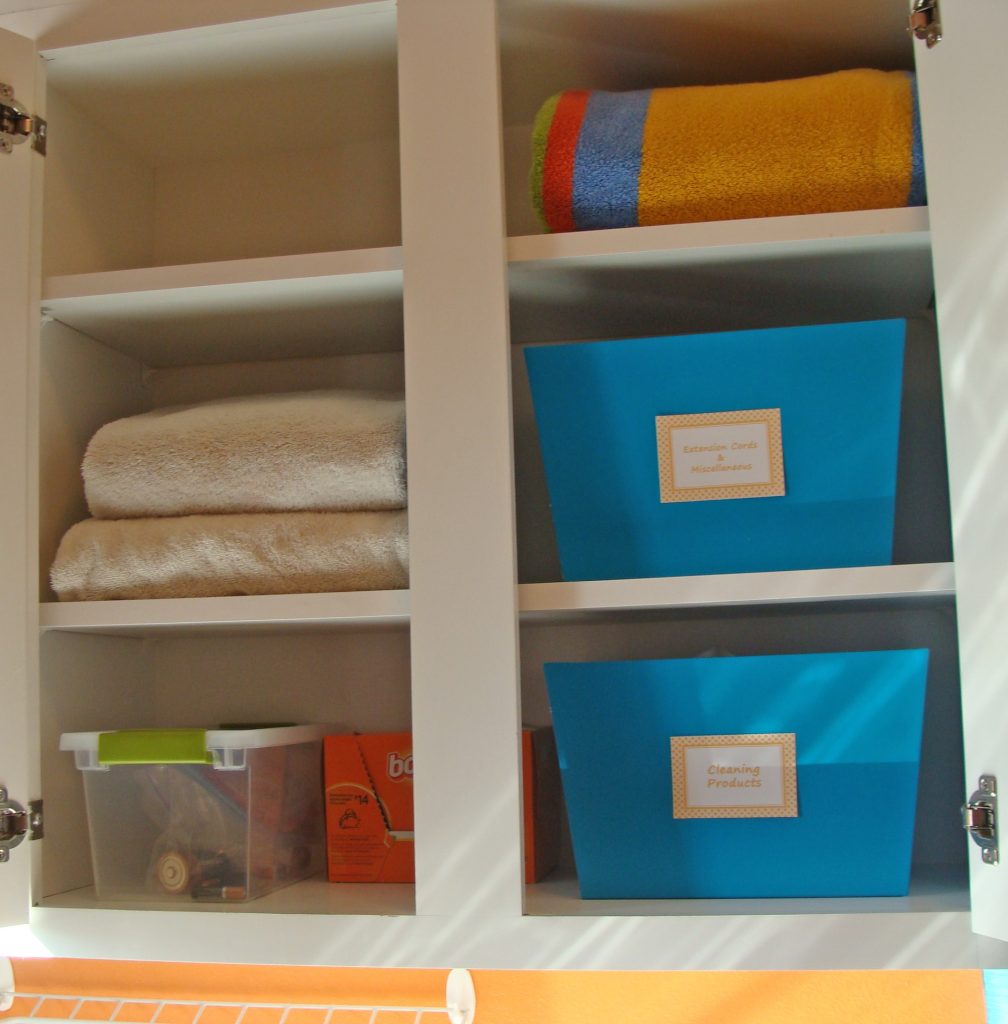
The other side of my storage cupboard holds some random stuff!
I have two more blue bins that hold “like items”: One box holds “special” cleaning supplies that I don’t want mixed up with my basic cleaning supplies (which I’ll get to in another post). I have my mop covers in this bin (so somebody doesn’t accidentally grab them and say,wash the car with them!) I would consider the other box to be my “utility bin”. It has a couple of extension cords, a lighter, thermostat with humidity gauge… We store most of our utility items in the garage, but this box has stuff that I want to have handy on a semi-regular basis.
The plastic storage bin is for batteries, and has a small screwdriver kit in it. I find this super helpful when the days come that it seems like every toy my kids own needs new batteries!
We have a couple full size towels for rags and my large beach towel (great for picnic lunches) on the shelves. We use the large towels on a regular basis to clean up messes or protect surfaces when we know a mess is inevitable! This keeps me from having to run upstairs to our linen closet. I think this is important because in honesty, there are many times that I would grab the whole roll of paper towel instead of run upstairs. Or I’d skip covering a chair before letting my kids get out paint and then spend the afternoon scrubbing spilled “washable” paint out of our fabric covered chairs!
And yes, you do see an empty spot on the shelves. In the summer I relocate a couple of beach towels to these shelves for quick access. Right now they are in a basket above our lockers – you’ll see those in an upcoming post.
A few more things that help me with this space are:
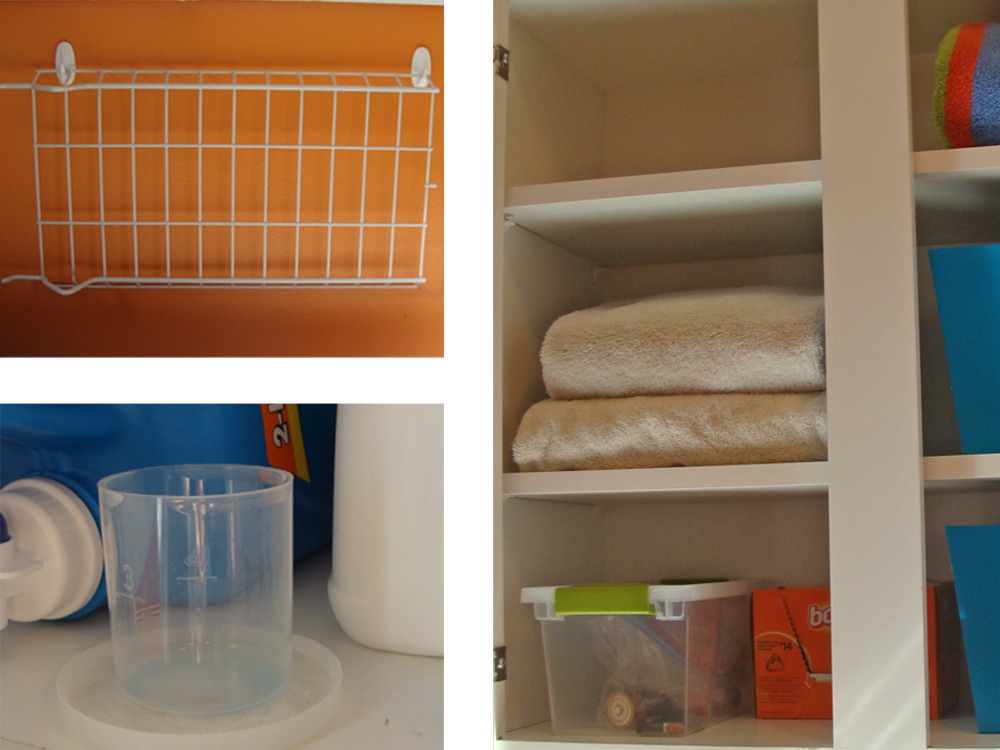
1. I hang the drying rack that came with my dryer on the wall behind the washer and dryer using two 3M hooks.
2. I have a small plastic disk that I put my detergent cup on, so the drippy detergent doesn’t spill all over the shelves. I do this to keep the shelf clean, but more importantly to keep the moisture from destroying the cabinetry. The plastic disk I use was a spoutless lid to a disposable sippy cup in its first life.
3. I fold towels so that you only see the rolled edge and not messy corners. This also helps the full-sized bath towels fit on a 12-inch shelf. Simply fold the towel in thirds the long way, then fold it in half – how a bath towel is often folded. Next, fold the towel in thirds again, starting with the “open-edged” side. You will fold the end with loose edges toward the middle, fold it again and end up with a neat rounded edge. Your towel should also then neatly fit on a standard cabinet shelf without hanging over the edge.
I also could not live without my drying rod! When we moved into our house the cabinets above the washer and dryer were all that were there. With my father-in-law who helps me, er I mean does most of our handy-man projects for me… we added the long shelf and rod that you see in this picture. We bought a standard 12-inch melamine shelf from Lowes, a wood shelf bracket (which I painted white) and a white metal rod. The shelf is screwed into the cabinets to hold it securely in place, and then the bracket adds additional support and stability for the clothes rod.
Our utility sink is directly below the rod, so I can hang wet clothes without worrying about water dripping and damaging anything. I can also hang dirty snow clothes, hats and gloves covered in snow on the rod to let them drip and dry. I highly recommend a drying rod in your laundry room if you can find a space for one – and I’m pretty sure you can if you get creative! : )
If you are determined to bring order to your laundry space, here are a few steps I’d recommend. And if you think it would be fun to make your laundry room cheery and fun, I’d recommend starting with establishing order. Ordering the space will take less time and money, be more rewarding and be an important first step to making the room look pretty.
1. Sort what you have and get rid of what you don’t use and never will use. Toss the random
samples of detergent and stain remover that you will never use because you don’t want to
risk what might happen if you do! Don’t feel bad that you will never line dry your linensin the summer
and you really only need about 15 clothespins.
2. Decide where things should go for the most efficient and convenient use of your space.
3. Pick up a few bins or baskets to corral the odds & ends. Make sure you categorizeyour items and don’t get too large of a bin. The bin is a boundary to help you limit what youhold onto and a reminder to keep only “like items” together. If you get a big basket, you
will save or buy things to fill the empty space!
*The blue bins I used were from the Target dollar bin – but were $3 each.
(Yes, they are the blue version of the gray ones in my pantry
The white canvas bins are from Michaels. You can find them in the craft storage section,
and if you wait until they are on sale you can get them for under $3 each.
4. Label bins and baskets so others can help maintain order, and to reminded
yourself not to toss random stuff in the wrong spot when you are in a hurry.
5. Only store things in this space that you need on a regular basis. Don’t let yourself
just stash stuff in the laundry room – it is an easy room for us to
fill with miscellaneous clutter. Make sure the things you store in your laundry
room are there for good reason. If not, consider relocating them to a linen
closet, garage, basement…
6. Add a hanging rod! No more ducking under wet clothes to walk through a door
or finding them in a heap because somebody wanted to shower. 🙂
It is also helpful in hanging clothes straight from the dryer to prevent wrinkles.
I have to admit that even though I don’t like to do laundry – I still think it’s fun to organize the laundry room! Which, raises another topic for a future post – do you have an organized “system” to doing your laundry? I will be posting how I keep my piles from burying me, and would love to hear how you all manage your piles! You can comment on this post, or email me at jaime@organizedhousewife.com. I’ love to be able to include some reader tips in my laundry post!


